Before anything else
Alunima is a review tool for animation. You bring in your shots, draw on them frame by frame, discuss them, and mark what is approved.
Three things are worth knowing from the start, because everything else follows from them.
Nothing leaves your machine. There is no server, no account, no upload. Your films, your drawings and your comments stay in a folder you chose. If you unplug the network, Alunima keeps working exactly the same.
A project is a folder. Everything Alunima knows about your film lives in it — shots, versions, drawings, comments, converted videos. Move the folder and you move the project. Put it on a shared drive and your whole team works in it.
Nobody overwrites anybody. Each person writes only their own file inside that folder. Alunima reads them all and merges them on screen. Two people can never write the same file, so there is no lock to wait for and nothing to corrupt.
This is a beta. Please report anything that looks wrong, however small — especially anything that made you lose time, hesitate, or reach for a manual.
The trial and your licence
Thirty days, everything unlocked. Not a cut-down version: you get the whole of Alunima — drawing, comments, export included.
Nothing closes afterwards. The app goes read-only: your projects still open, you still read the drawings and play the shots back. What you lose is the right to add — to draw, comment, export. Nothing is erased, and a key picks up exactly where you left off.
The trial does not restart. Reinstalling the app doesn't reopen it, nor does a new project, and winding the clock back doesn't give you back the days you have used.
Activating your licence
Menu Alunima → About, then Enter a licence key. Paste the key you were emailed after your purchase, and that's it. You can do it on day one — there is no need to wait for the trial to end.
The same key covers several machines — four on a Studio licence. A machine is a computer: yours at the studio, the laptop at home.
Before you leave a computer for good, open About and choose Release this machine. The seat is freed and you can use it elsewhere. Without that step the seat stays taken — which is what happens when you reinstall your system, and the old machine still counts.
If every seat is in use, Alunima says so and tells you what to do. And if the machine is gone — stolen, dead, wiped — write to contact@alunima.app and the seat will be freed.
What the licence asks of the network
Once, when you activate. After that Alunima checks again now and then, at most once a day, and silently.
If the network doesn't answer, nothing happens: no message, no lock, no countdown. A studio cut off from the world works like everyone else. That is the promise of the first chapter, and the licence doesn't dent it.
A dated licence — school, beta tester — does stop on its date, offline included: that date is known in advance and written on your machine. The About box shows it at all times, and a banner warns you over the last seven days.
Where this is written
Two small files, plainly named, in the app's folder: .alunima-trial.json for the trial dates, .alunima-licence.json for the licence. Nothing else is written, and nothing is sent.
Getting started
Opening a project
Alunima opens on a list of your projects. To start a new one, choose Open or create a folder… and pick an empty folder. Alunima sets up its structure inside it.
The first time, Alunima asks for your name. It is a plain label, not an account: it signs your comments and your drawings so your team knows who drew what.
If several people already use the folder, you are offered their names instead — pick yourself from the list rather than creating a second entry, or @mentions become ambiguous.
Creating sequences and shots
When you create a project you can have Alunima pre-generate the structure: give it your naming convention — prefixes, number of digits, starting number, increment — and it builds the empty sequences and shots for you. A live preview shows the result before anything is created, so you can check the naming first.
This is optional. You can also create sequences and shots one at a time, from the tree on the left.
Bringing your shots in
Drag a file onto a shot, or use + version. Alunima accepts what your system can read — MP4, MOV, WebM — plus still images and PDFs, which become frame sequences.
Your file is copied into the project, not merely pointed at. Renaming or moving your original afterwards breaks nothing. This also means the folder is self-contained: hand it to someone else and everything plays.
Alunima also builds a lighter proxy of each video for smooth scrubbing. The original stays untouched and is used whenever full quality matters.
Constant frame rate — for a trustworthy frame count, prefer videos with a constant frame rate. Alunima flags the others with a VFR badge next to the frame counter: on a variable-rate file, "frame 24" is an estimate.
A format Alunima cannot read says so. Drop an .avi, an .exr or anything else outside the list and a message names the file, tells you what to export it as, and lists what is accepted. Nothing is copied into the project. This matters for uncompressed renders straight out of a 3D package: they weigh gigabytes and would not play — Alunima reads video through the same engine as a browser, which has no AVI support at all.
One thing worth knowing when you convert: a valid H.264 file can still refuse to play if it was written in 4:2:2 or 4:4:4. Ask your encoder for yuv420p — with ffmpeg, -pix_fmt yuv420p.
The review screen
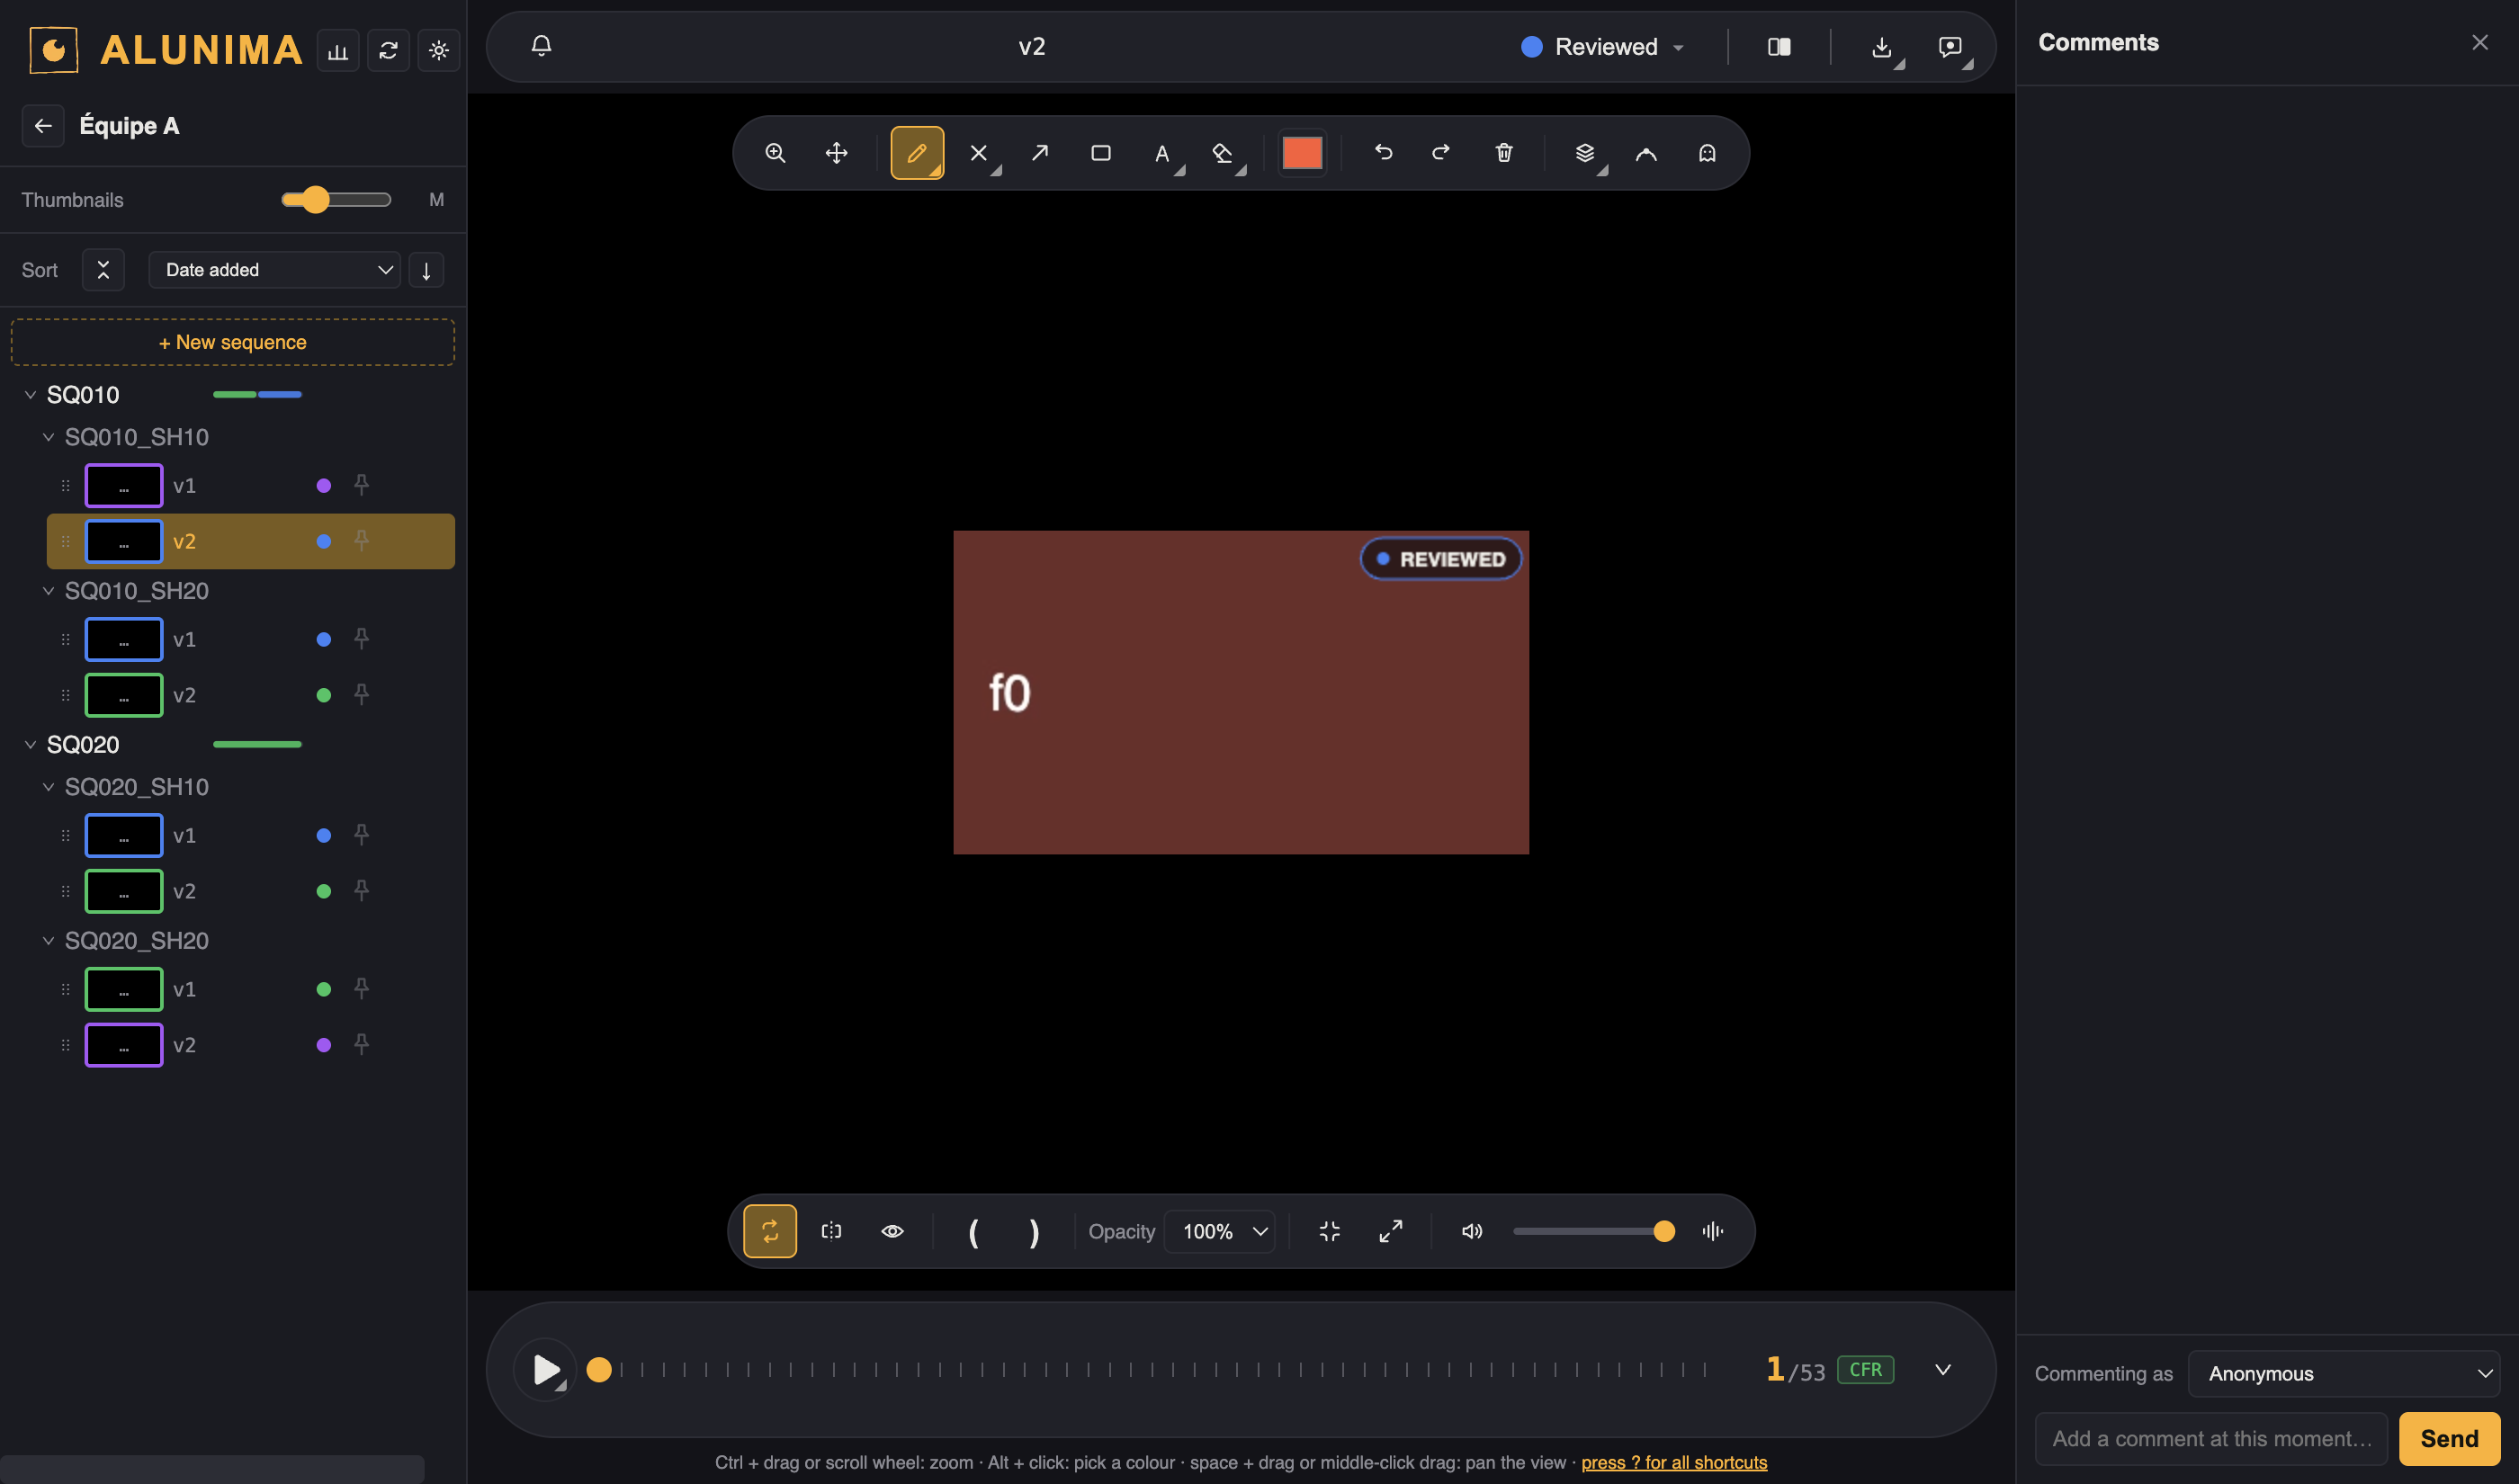
The tree lists sequences, shots and versions. Coloured dots carry each version's status, and the bars next to a sequence summarise how far along it is. Thumbnail size and sort order sit right above the tree.
The floating toolbar above the image holds the drawing tools. Below the image, a second bar holds playback and view controls: loop, in/out range, hide drawings, opacity, fullscreen, volume and waveform.
The timeline carries a tick per frame. Drawings and comments appear on it as markers, so you can see at a glance where the notes are and jump between them with the up and down arrows.
The top bar names the version you are on — and, with a pipeline, the stage you are working in — then holds the status menu, Compare, export and review recording. It does not spell out the sequence and shot: your version names already carry them. Hover the title if you want the full path.
Annotating
Drawings are placed on a single frame, directly over the image. Everyone draws on their own layer: your strokes stay legible above your colleagues', and nobody can erase anyone else's work. A Layers button lets you show or hide each person.
The tools
Pen, eraser, arrow, rectangle, text and cross, plus colour and thickness. Hold the mouse down on a tool to open its settings — a folded corner marks the tools that have some. Right-click does the same, without the wait — on the tools, and on playback, export and review recording too.
Each panel has a pin next to its close button: a pinned panel stays open when you open another one, so you can keep onion skin in view while adjusting the pen. Closing a panel unpins it.
Pen tablets
Alunima listens to the pen itself, not to its mouse emulation. On Windows that means it draws whether or not "Windows Ink" is ticked in your driver's preferences (Wacom, XPPen, Huion). If you had to untick that box with a version older than 1.0.53, you can set it back the way your other software likes it.
| Shortcut | Action |
|---|---|
B | Pen |
E | Eraser |
H | Hide every drawing — see the plate on its own |
M | Move the drawing |
S | Onion skin on/off |
← → | Previous / next frame |
↑ ↓ | Jump to the previous / next marker |
Alt + click | Eyedropper — pick a colour from the image |
Ctrl/⌘ + Z | Undo |
Moving a drawing in the frame
You drew a corrected pose over the image and you want it further along. Take the Move the drawing tool (M) and drag: everything you drew on that frame moves together — strokes, arrows, text. Hold Shift to keep it on one axis, which is what you want when the pose should stay at the same height.
Hold the tool button, or right-click it, for two more commands. Mirror, which flips your drawing on itself — around the drawing, not around the image, so a pose does not fly off to the other side of the frame. And Size, a slider that grows or shrinks it. Line thickness deliberately stays as it is: a note has to remain readable at any size. Text and crosses follow.
Ctrl/⌘ + Z takes any of it back, exactly like an unwanted stroke. And you only ever move your own drawing — a colleague's strokes are not yours to touch, here as everywhere else.
Moving a drawing to another frame
A drawing belongs to one precise frame. To shift it by a frame or two, don't draw it again — drag its marker along the timeline. It snaps frame by frame as you move.
Two limits, both consequences of how team mode works:
- you can only move your own strokes — your colleagues' are read-only, since each person writes only their own file;
- if the target frame already carries a drawing of yours, nothing moves. Undo works per frame and could not take back a gesture spanning two.
Onion skin
S shows the drawings from neighbouring frames in transparency — tinted blue towards the past, pink towards the future. Opacity falls off with distance, so a close drawing reads more strongly than a far one.
The panel offers two readings, and they answer different questions:
- by frame range — show whatever falls within N frames. Use it to follow an element from one frame to the next.
- by drawing count — show the N nearest drawings, however far away. Use it to find your neighbouring notes when annotations are sparse.
The slider labels follow whichever reading you picked, and the choice is remembered.
Ghost frames
P pins the current frame as a ghost: it stays visible in transparency while you move elsewhere, which is how you check a pose against a key. Shift + P clears them all.
Reading a movement
A drawing says where. A tracked path says when, and that is a different conversation.
The motion path tool marks a part of the image — a hand, a foot, the head — from one frame to the next. It draws an arc through those marks and, along that arc, one tick per frame. Those ticks are the reading: close together where the part slows down, far apart where it speeds up. That is the spacing, and it reads at a glance without a single number.
Tracking
Take the tool and click where the part is. The click sets a key on the current frame and jumps ahead on its own — you click, click, click, without ever touching the playhead. How far it jumps is set in the panel: three frames by default, fewer on a fast move, more on a slow one.
The trail builds under your eyes as you go, so you can see straight away whether your tracking is even, instead of finding out at the end.
You do not have to key every frame. Set the ones that matter; the arc runs through them and fills in the rest.
To correct, simply click that frame again: the key is replaced, not doubled. You can also drag it on the image. Shift-click removes it, and Ctrl/⌘ + Z undoes every one of these gestures.
The jump never lands on a frame you have already pointed. Come back to set a key between two close ones — pinning down a contact, filling in a passage — and the playhead stays put: you chose that frame, it stays in front of you. But when the stretch ahead is still untracked, the jump works as it does anywhere else, and stops of its own accord as it reaches the keys you already have. And if you would rather never move at all, set the jump to 0.
Proposing another rhythm
This is where a tracked path becomes a review note.
Every key also appears on the timeline, in the path's colour. Drag one a frame or two: the arc does not move, but the whole spacing redistributes. You have just said "your peak lands a frame too early" by showing it, over the animator's own shot, which is playing underneath.
It is the same gesture as moving a drawing from one frame to another — you already know it. And if the target frame already holds a key, nothing moves: two keys merged silently would be one key lost.
Why the original is not kept. The "before" is the footage itself. If your path says "peak on frame 7" and the hand gets there on frame 9, the gap shows without needing a second arc on screen.
Several paths
+ Path adds one, with its own colour. Follow a hand and a foot, or the same point with two different rhythms. Double-click the name to rename it — "L hand" beats "Path 2" once there are three.
The timeline keys belong only to the selected path, and only to the motion path tool: switch tools, or click the path's chip again to deselect it, and the timeline clears. The arcs themselves stay visible.
All of this goes into your exports — video, still and animatic alike. That is what makes the remark sendable.
Status and approval
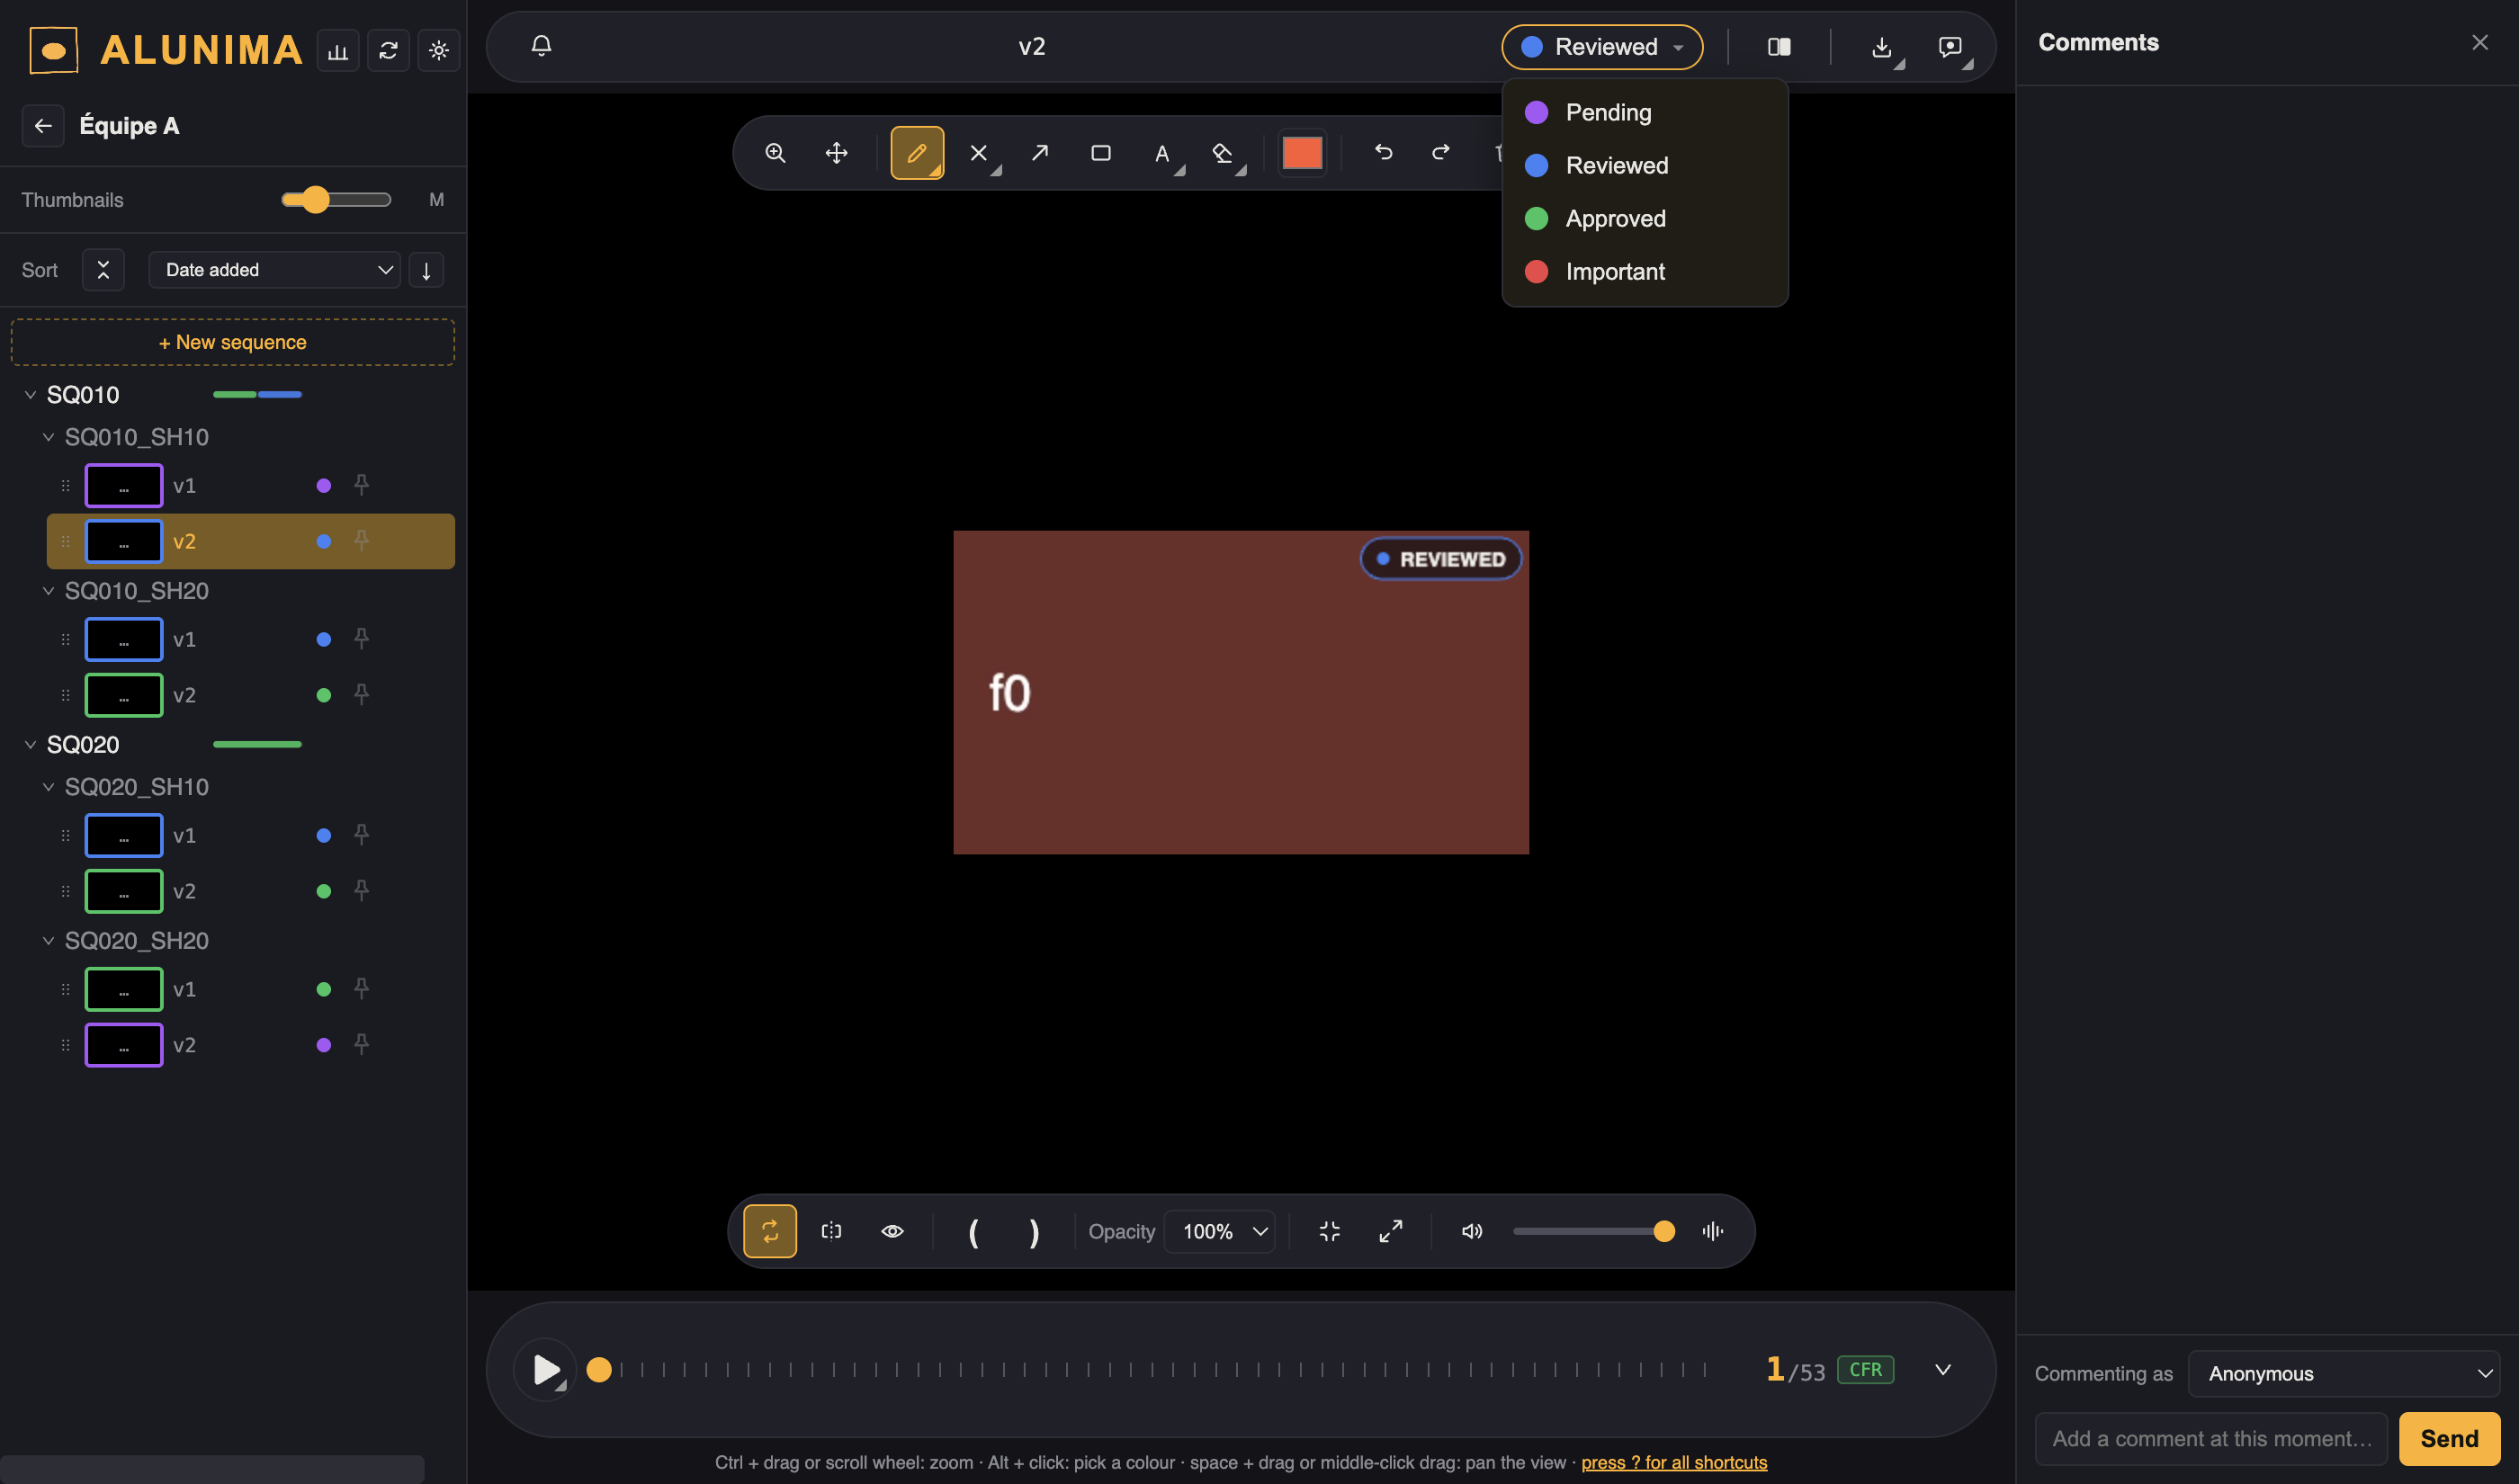
Each version carries one of four statuses: Pending, Reviewed, Approved or Important.
A shot has only one approved version at a time. Approving a new one sends the previous back to Reviewed. This is what lets Alunima know which version to play in a sequence, and which to use when exporting.
The status is also drawn into the image — a pill in the top-right corner, in the status colour. Because it is drawn rather than laid over the screen, it stays in everything you export: video, still image and animatic alike. In an animatic, each shot carries its own, which is precisely what you want to read while watching. It does not disappear with H: it is not an annotation, it is the state of the version. You can turn it off in the settings.
Preparing a review session
Pin the versions you intend to show with the pin on each row. A Pinned line then appears just above the tree, with the count: click it to show only those versions, and jump between them with keys 1 to 9 — without looking away from the image. The line turns amber while the filter is on, so a tree showing only part of the film always says why. Alt-click to unpin everything.
The line exists only while something is pinned; unpin the last one and it goes.
A pin is on the version, not the shot: during a review you often want v4 and v5 side by side. And a pin drops by itself when the version's status changes: you present, the supervisor marks it Reviewed or Approved, and it leaves your list. The agenda empties itself as the session goes.
Pins are personal and local to your machine. They are not part of the project and your team does not see them.
Production stages
A film is tracked one of two ways, and both are complete ways to work — not a setting half done.
As a whole: one figure for the whole film. That is what a short needs, or any film where one person carries a shot from end to end.
By department: the film is split into stages — layout, anim, lighting, compo — and the screen shows one at a time. Each has its own page, its own unit and its own approval.
You choose in Production, on the How this film is tracked card, with two buttons. As soon as a pipeline exists, the Stage row appears above the tree. Going back to tracking the film as a whole loses nothing: versions keep the stage they were given, and typing the same names brings them back.
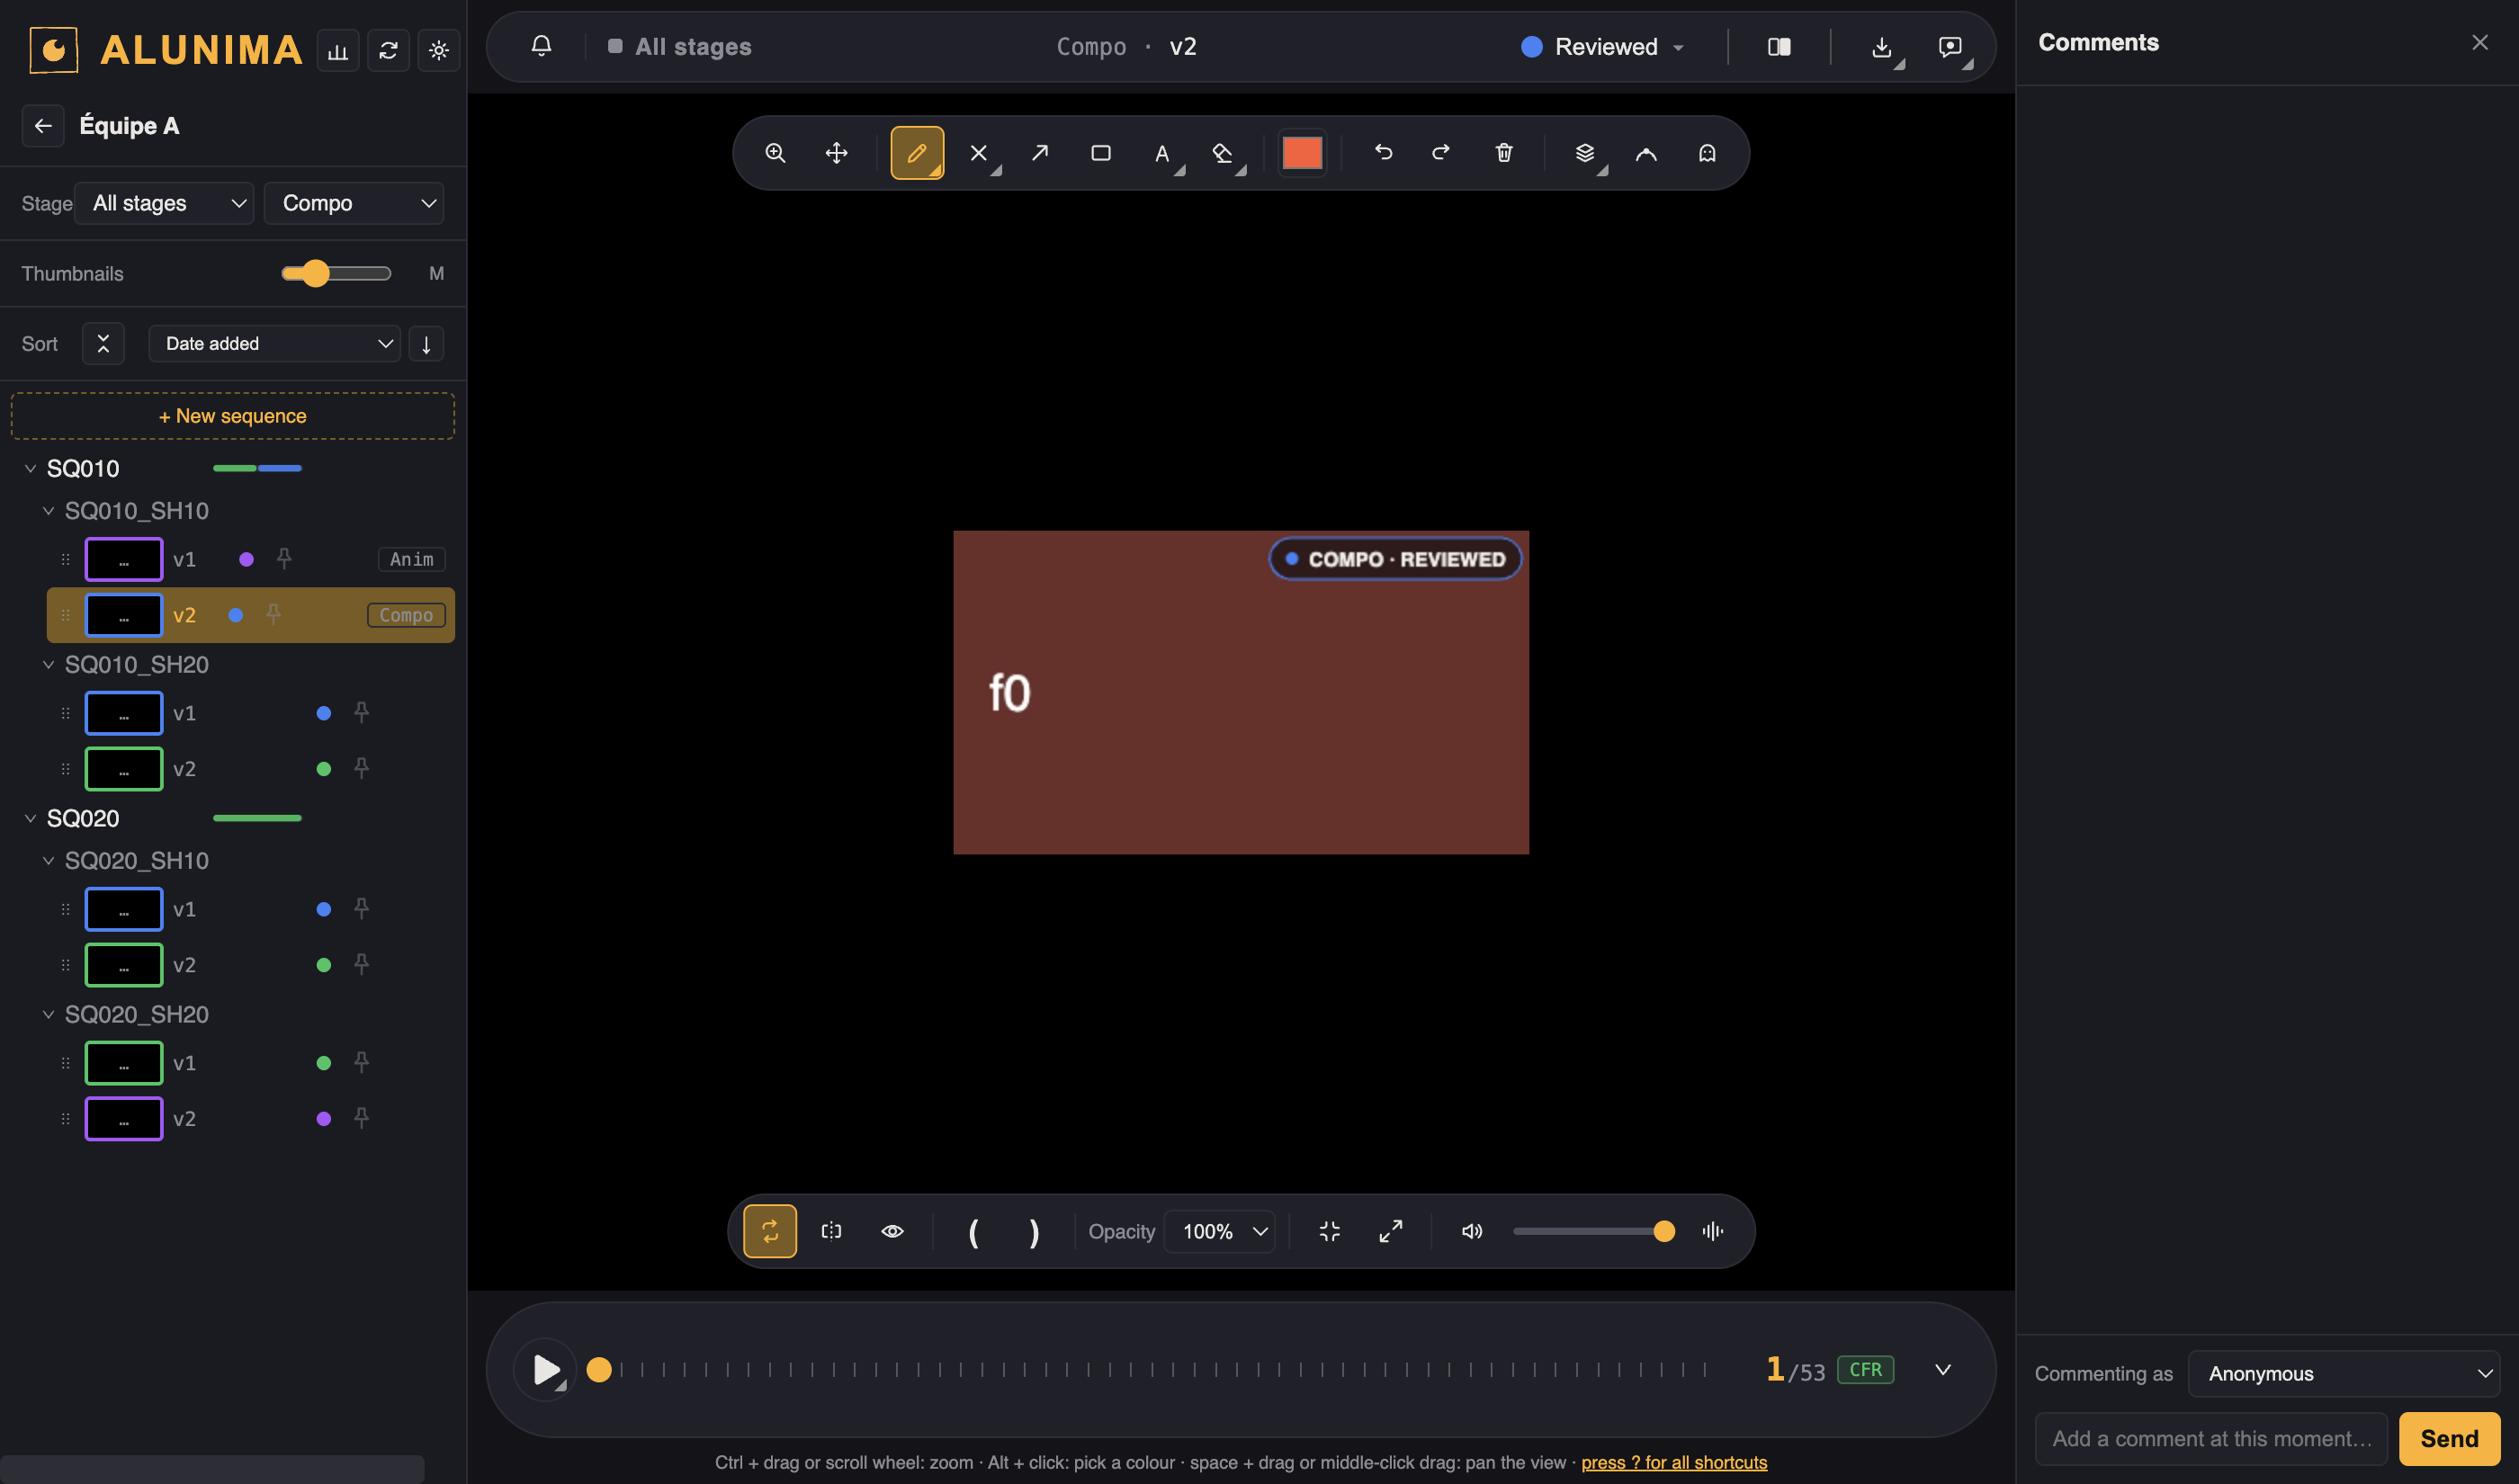
The hierarchy does not change. A shot stays a single thing — one name, one duration, one thread of comments. It is the version that belongs to a stage. So the same shot can carry an anim version and a compo version, and you look at them one at a time.
Set the pipeline in production tracking, under Film setup — the card at the top. Type your stages separated by commas, or click 2D, 3D or Mix to start from a model and edit it. The same thing is reachable from the Stage menu's Edit pipeline… when you are already in the tree. The list belongs to the film, so two films can have different pipelines.
Until a film has a pipeline there are no tabs, so the card sits on the tracking overview instead — it is the one thing that screen asks you for, and it moves into Film setup as soon as you apply a pipeline.
Reordering, renaming and removing are all safe. A stage keeps its dates, its unit and its approved shots — fixing a typo in a name costs nothing. And removing a stage puts nothing at risk: type its name again, whenever you like, and it hands its shots back. A stage is identified by its name, so the one that comes back is the one that left.
Approval is per stage. "This shot is approved" means nothing once two crafts work on it — approved by whom? Anim can go back for a retake without demoting the compo, and each craft approves its own.
The top bar says which space you are in. The stage you are filtering on is written in front of the path, in bold and in its own colour, with the same little square used by the tracking cards and the timeline. While a stage is active, the version's own stage is no longer repeated at the end of the line — everything on screen belongs to that stage. In All stages, the heading turns grey and the version's stage comes back at the end, where it is the one thing that tells you something.
Versions with no stage are never hidden: they have their own Unassigned line in the menu.
A filter never hides work in silence — the Stage row is there for as long as the film has a pipeline, and the menu is tinted while a stage is active. Pinned versions and the
1–9keys follow the stage you are looking at.
Comparing versions
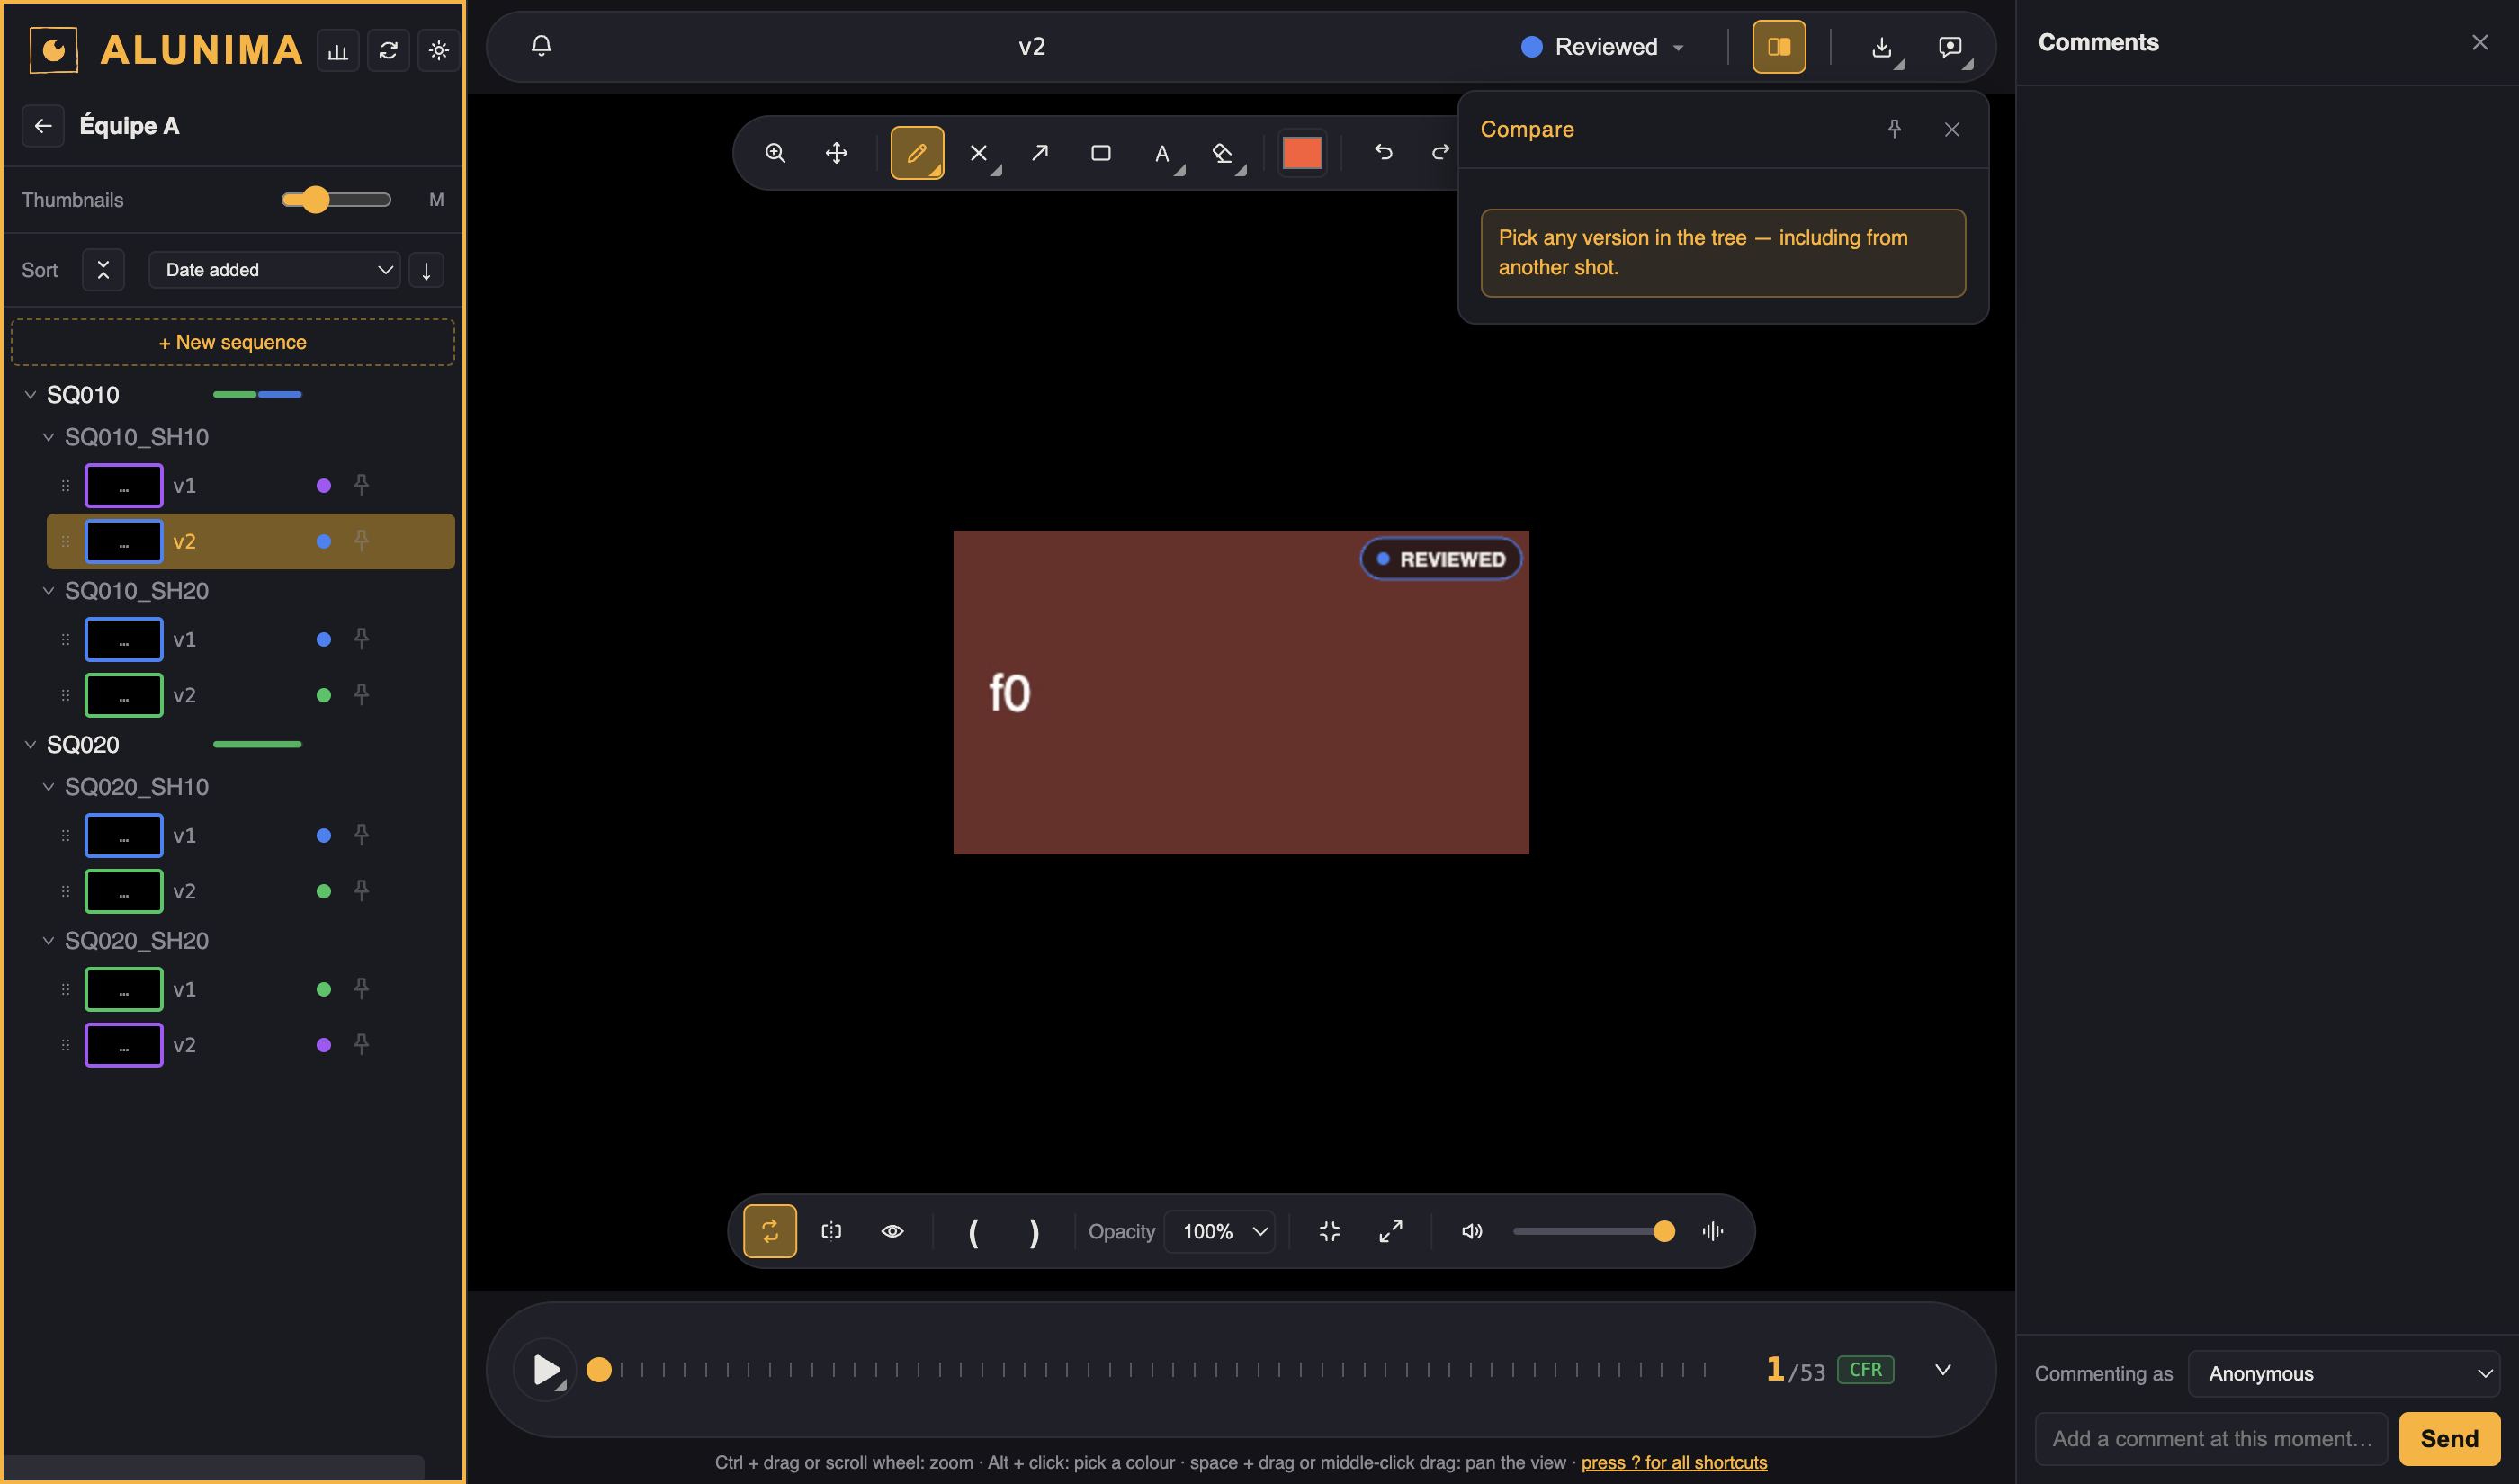
Open Compare and the panel itself becomes the picker: click any version in the tree to put it opposite the current one. You can compare two versions of the same shot, or two different shots — which is how you check a cut.
Four layouts:
- Side by side — both images, full frame.
- Overlay — one over the other, with an adjustable blend.
- Wipe — a sliding curtain across the image.
- Flip — one at a time; hold
Cto show B, release for A. Flipping between two states is often the fastest way to see what moved.
Zoom and pan stay synchronised between the two images. One timeline drives both.
Match cut lines up the end of one shot against the start of the other, in the direction your edit implies. It sets an offset rather than moving playheads around, so stepping backwards through A keeps working.
Stop and reset returns every setting — layout, blend, wipe position, offset — to its starting state, not just the ones you touched.
Recording a spoken review
Press R to start recording, R again to stop. Alunima captures the image, your voice and what you draw as you talk, and attaches the result to the version. It is meant for what a written comment cannot carry: tone, timing, and pointing at something while you say it.
You can pick which microphone to use, right in the panel. If the one you picked is unplugged, Alunima falls back to the system default rather than failing mid-review. Microphone names only appear after the first recording, until the permission has been granted.
You choose what gets captured, and you can record in WebM or MP4. WebM is the default — lighter for the same quality, and readable in VLC, browsers and every editing suite. Pick MP4 when the recipient needs it.
Working as a team
Everyone points at the same folder. Each person writes only their own file inside it; Alunima reads all of them and merges them on screen.
What that buys you: no lock, no waiting, no corruption, and no server. If you and a colleague change different things about the same shot — you the name, them the order — both changes survive. Change the same thing and the most recent wins.
On a cloud folder — Dropbox, Drive, OneDrive and iCloud all work, and this is how you work remotely. Alunima names the service it recognises under the folder path, in the settings.
On a NAS or your own server — anything your system mounts as a folder will do: a NAS over SMB or NFS, a studio share, a server reached through a VPN, a Nextcloud mounted over WebDAV. Mount it, then point Alunima at it like any other folder — it never needs to know the folder is remote. What it cannot do is connect to a server by its address: there is no account, no protocol, only files in a folder. And over the internet, images travel in full every time they are displayed: use Carry this project to work on a local copy and sync when you choose.
Other people's changes appear when you refresh, not live. F5 refreshes.
Drawings belong to their author. You see your colleagues' strokes next to yours on the same frame, and can hide any of them, but you can only edit your own.
Mentions. Type @ followed by a name in a comment to mention someone. They see a badge on the bell at their next refresh, and a system notification if the app is open.
Removing someone takes them out of the list of people; their files — and so their work — stay in the folder. Nothing they drew is lost.
Discord notifications
A mention only reaches someone who opens Alunima. Discord notifications close that gap: write @Marie in a comment and Marie is pinged on Discord, so she hears about it with the app closed.
Off by default, and behind two locks — the feature has to be in your build, and the project has to be set up for it. Until both are true, nothing is sent.
Turn it on in the settings, under Project → Discord notifications:
- A webhook URL, shared by the team. Create it in Discord: Server settings → Integrations → Webhooks, pick the channel you want, then copy the URL. Paste it here — the line underneath tells you straight away whether it looks like a real Discord webhook. One webhook per project.
- Your own Discord user ID, which each person fills in for themselves so the others can ping them. In Discord: Settings → Advanced → Developer Mode, then right-click your name and Copy User ID. Someone with no ID simply is not pinged; nothing breaks.
What leaves your machine, exactly. The author's name, the names of the people mentioned, and the shot the comment is on — sequence, shot, version. Never the text of the comment. Alunima is built on "nothing leaves your machine"; this one feature departs from that, so it stays an explicit choice and says out loud what it sends.
Two details worth knowing. The ping is sent from the author's machine, the moment the comment is written — waiting for the recipient to open Alunima would defeat the purpose. And a webhook posts in a channel, not in a private message: people are mentioned there by their Discord ID. A shot named @everyone cannot ping the whole server — only the people actually mentioned are allowed through.
If the ping fails — no network, a dead webhook — nothing is said. A failed notification must never interrupt a review or make you doubt your comment was saved. It was: the comment lives in your folder, the Discord message is a courtesy on top.
Working away from the studio
You work on the studio folder all day. In the evening you take the film home, work offline, and bring it back the next morning. Without Dropbox or Drive — which many studios do not allow — and without anything going over the internet.
Alunima pairs your project with a second folder: on your laptop, on an external drive, on a stick. It then copies whatever is missing or newer both ways.
Nothing is ever deleted. Alunima adds, or replaces with what is newer. It never removes: a file missing on one side may have been deleted, or may simply not have arrived yet, and that question has no reliable answer.
Pairing a folder, once
In the preferences, Working away from the studio → Pair a folder… Pick an empty folder, on the disk you carry.
The first trip out takes the whole film, media included: it is long. Every trip after it takes seconds, since only changed files travel.
Pairing works both ways: each folder knows the other. That is what lets you open your copy at home and have Alunima know where it came from — the exact moment you need it.
A folder has only one partner. Pairing a new folder unpairs the old one, on both sides: three folders are never linked in a chain. If you have a NAS, an external drive and your computer, choose which pair you carry — or re-pair in the evening.
The day-to-day gesture
Open the Projects menu — the badge carrying your name, on the home screen and in the top bar — then Carry this project…
A panel opens. It names both folders, marks the one you are standing in with you are here, and separates what leaves from what arrives, with the sizes:
↓ 4 files to send — 12.4 MB ↑ 1 file to receive — 3.1 MB
Nothing moves until you choose. Picking the wrong folder is the only real danger here, which is why you see it first.
During the copy a bar advances and the name of the current file goes by. You can stop — never in the middle of a file. Carrying again later simply finishes what was left: a stop is a pause, not a failure.
Knowing where you are
In the Projects menu, a paired folder carries a ⇄, and its tooltip names the one on the other side. The folder that was created as a copy also carries the words my copy: what is not marked is where the work comes from.
And when you get home and the studio folder is out of reach, Alunima offers to open your copy instead of merely reporting the failure.
Solo mode is refused. A solo project has a single data file, written by one machine; two places would write it in turn and the last one would erase the other's work. Alunima would rather refuse than cost you a day once in ten. Carrying needs a team project.
This is not the sync button. The round button next to the project name re-reads the shared folder — it refreshes what your colleagues wrote. Carrying is something else: two folders, two places, a copy both ways.
Production tracking and the daily quota
The chart icon at the top of the sidebar opens a separate screen: how far the film has come, and how much each animator has to deliver per day to finish on time.
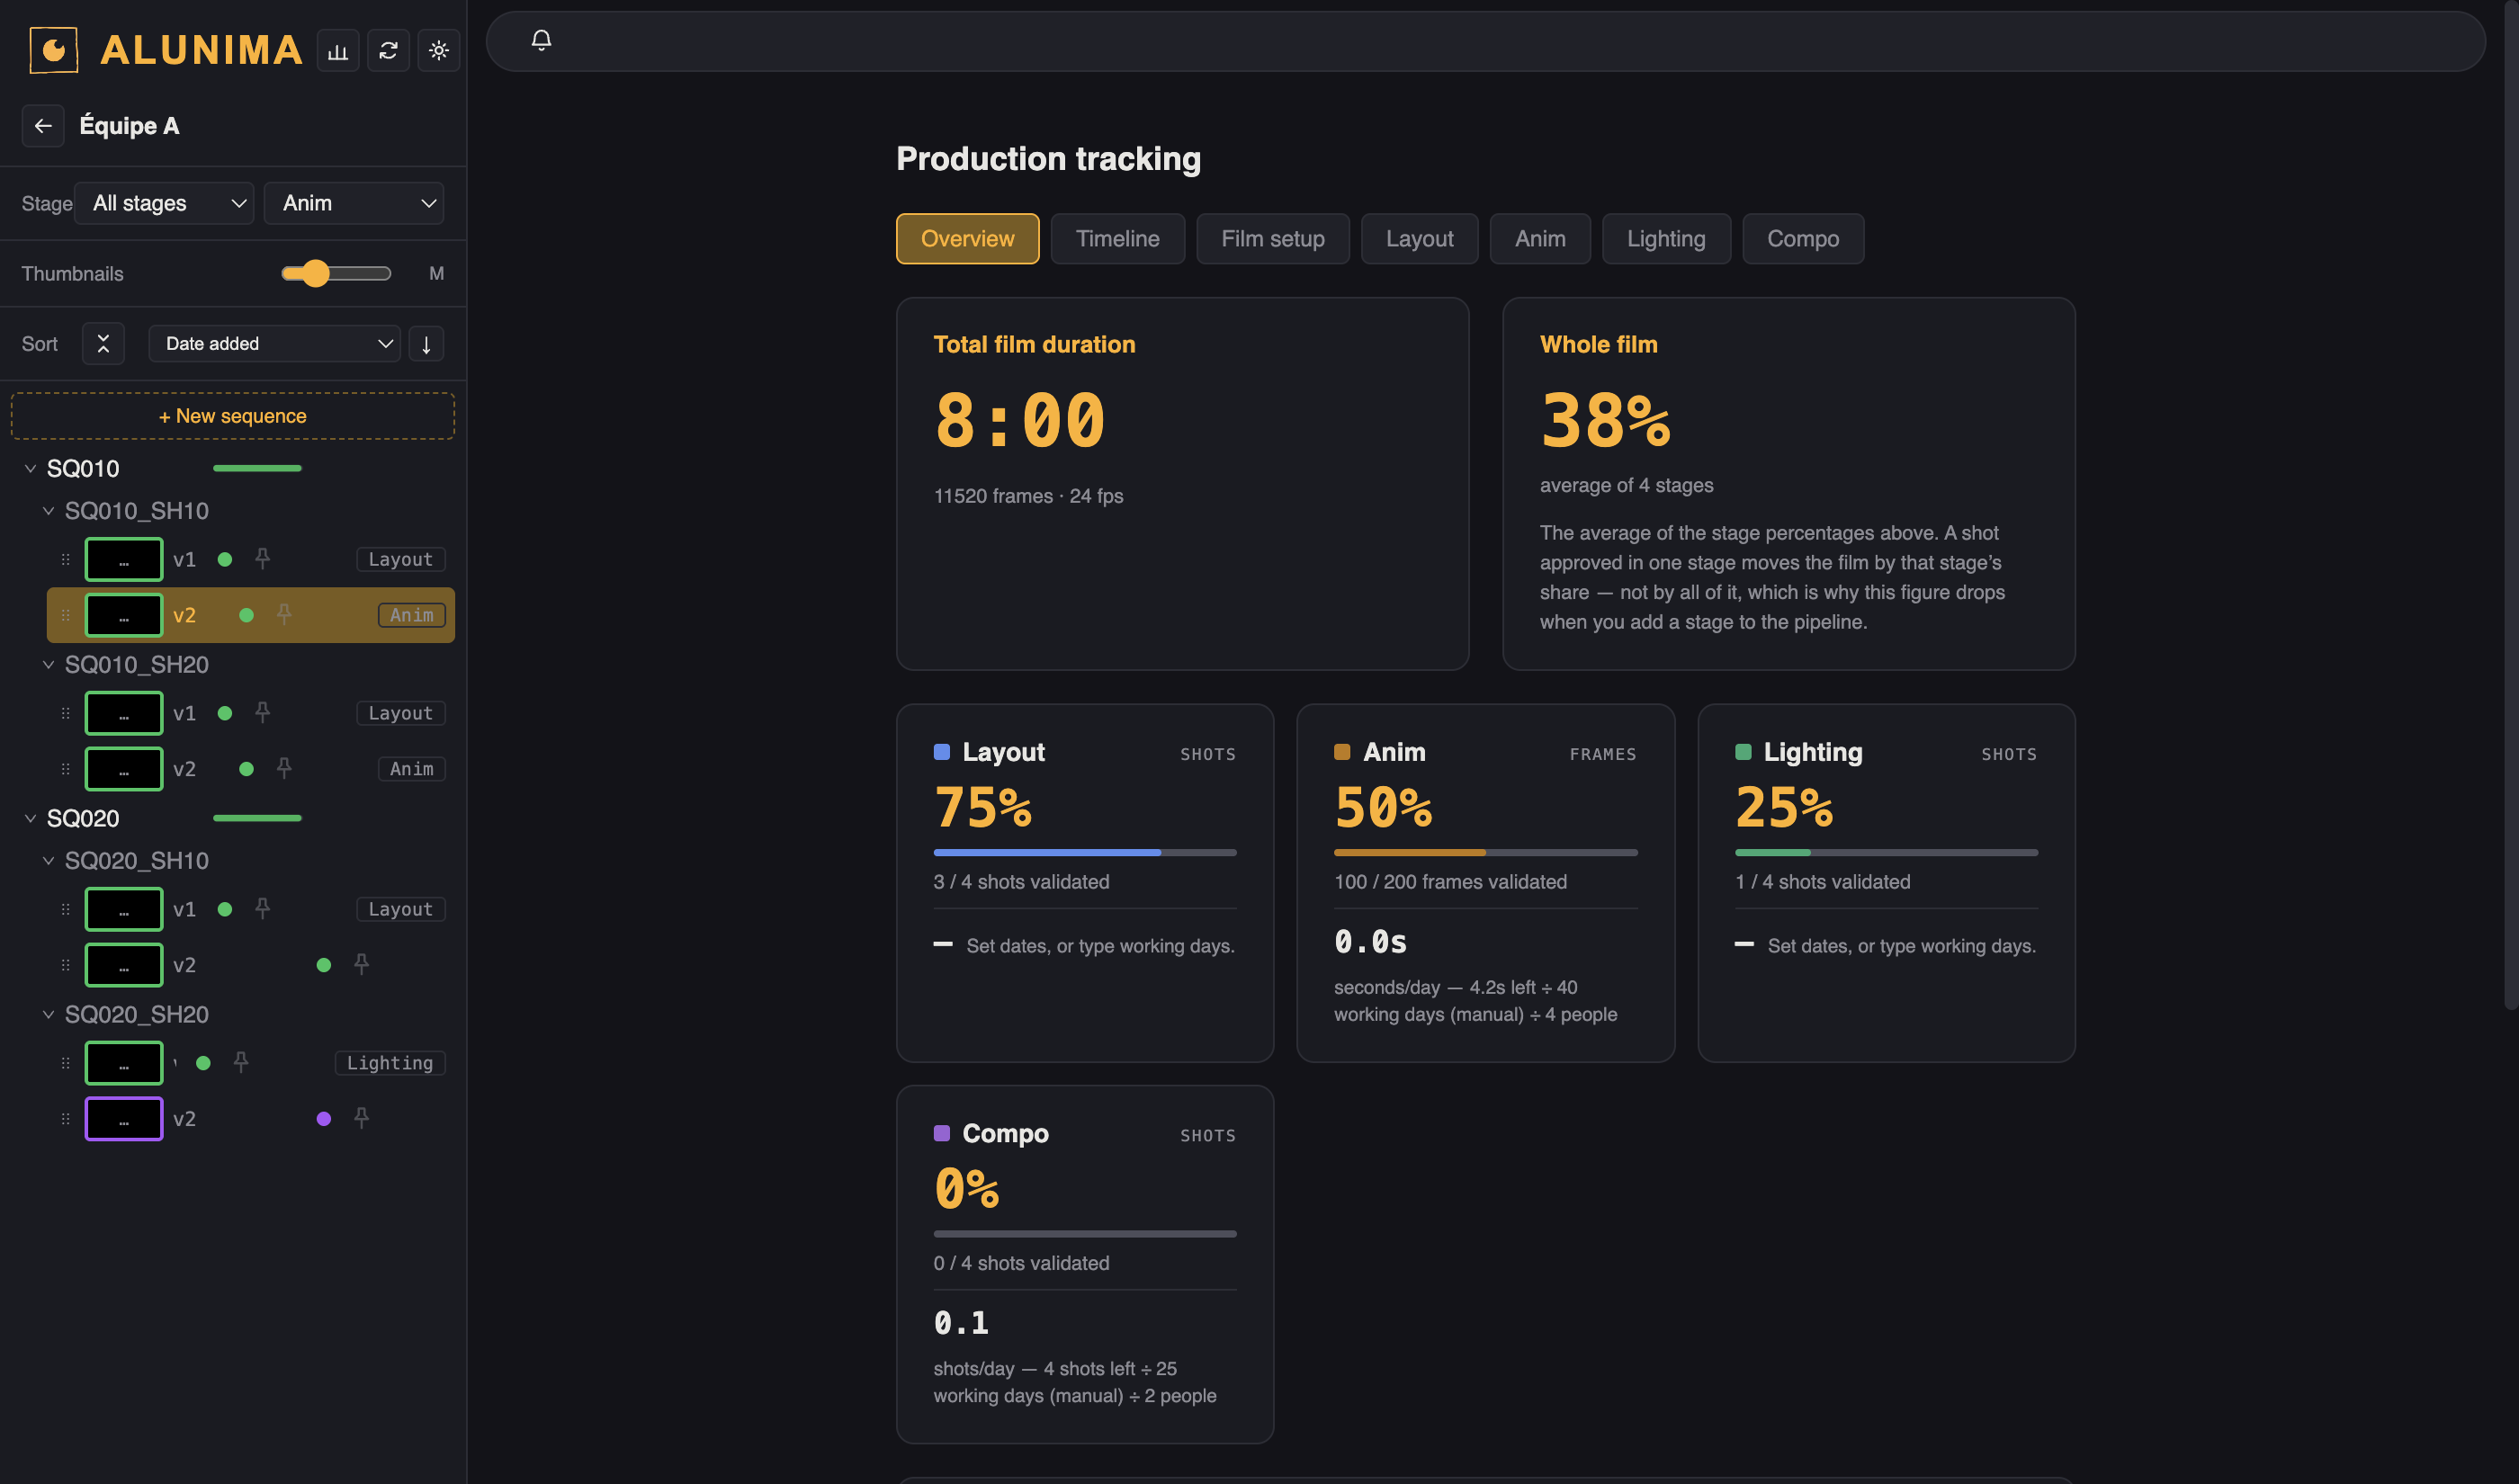
With a pipeline, this screen splits by stage. A tab bar appears — an overview, then one page per stage — and each stage carries its own progress in its own unit: animation in frames (a long shot weighs more), layout, lighting, FX and compositing in shots. Each stage also has its own dates, its own team size and its own daily quota, expressed in that unit: seconds of animation per day, or shots per day.
The total is worked out for you — the film's duration for a stage measured in frames, the number of shots for one measured in shots. You only type it in when a stage covers just part of the film: without that, a stage concerning half the shots would peak at 50% having finished everything.
Whole film then becomes the average of the stages. A shot approved in layout moves the film by layout's share, not by the whole of it — which is why the figure drops when you add a stage to the pipeline: there is more work to do than there was.
Where you read, and where you set. The tabs split in two: Overview and Timeline only report — they never ask you for anything — while Film setup and each stage's page are where the figures are typed. Total film duration, frame rate and the production dates move to Film setup, and the overview shows the duration as a plain figure beside the film's percentage. Without a pipeline there are no tabs at all, and everything stays on the one screen, as before.
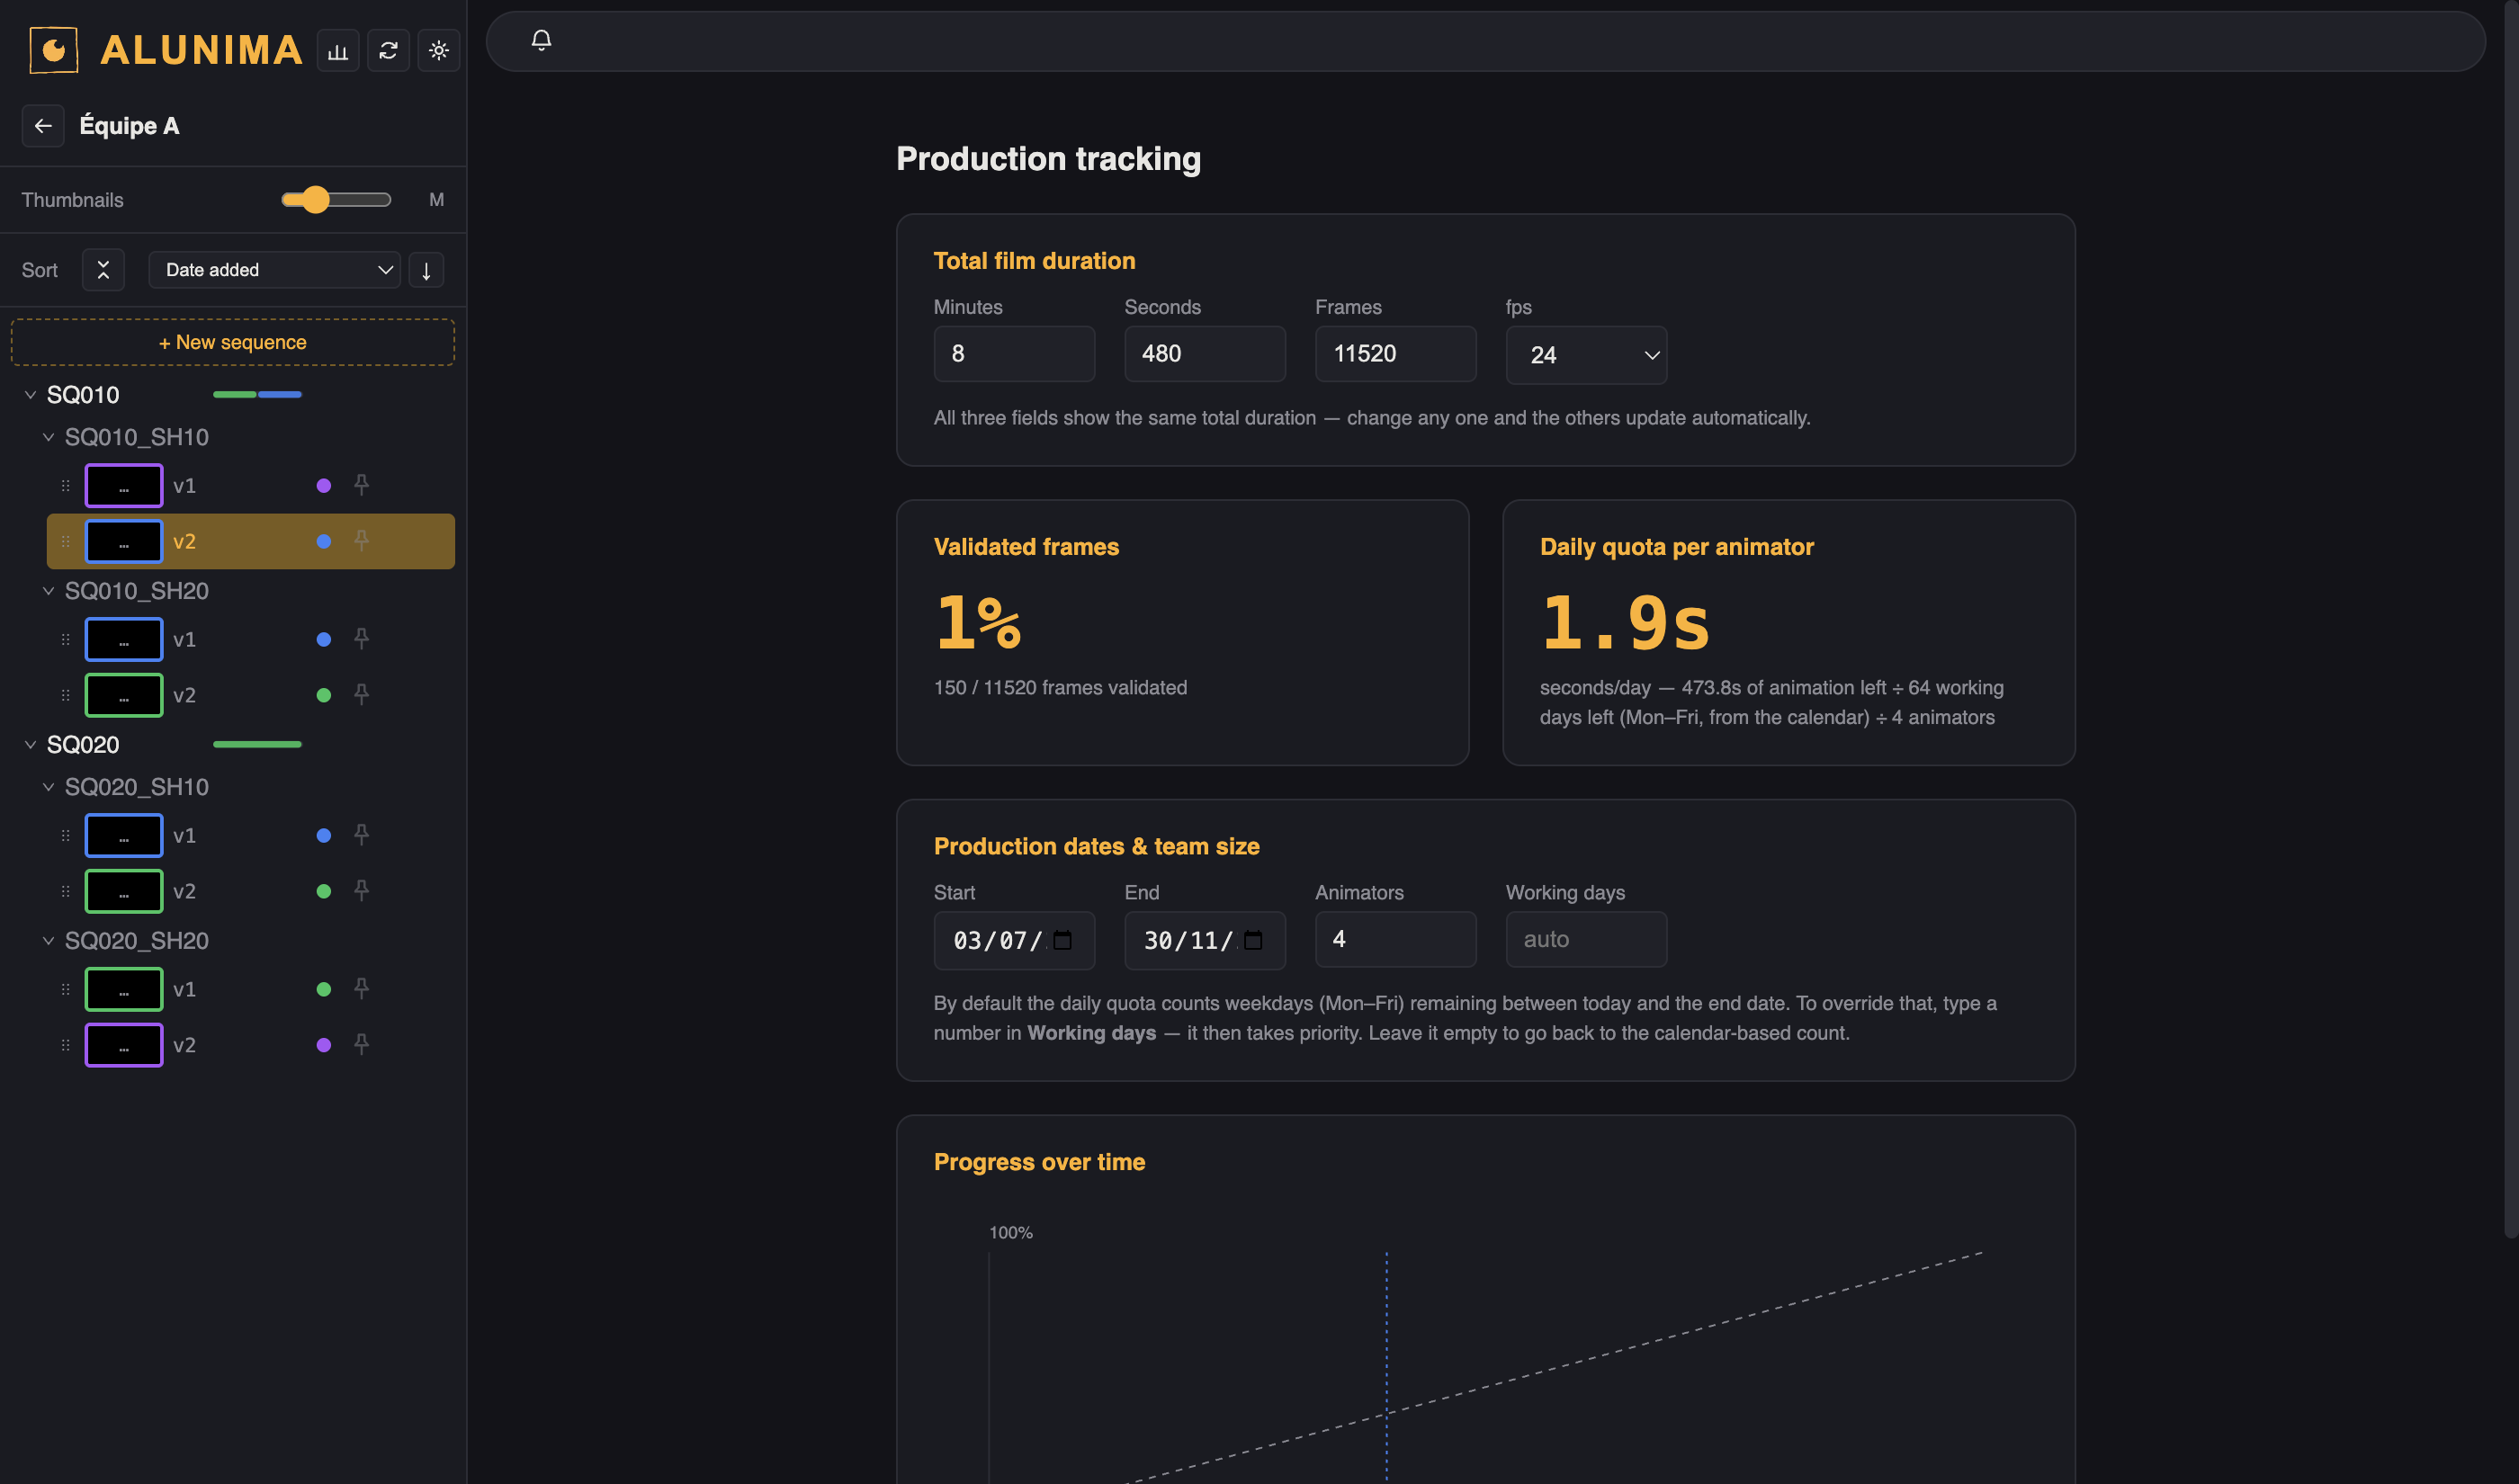
Total film duration is the only thing you type in — here on this screen, or in the Film setup tab once the film has a pipeline. Minutes, seconds and frames are three views of the same number: change any one and the others follow. Set the frame rate here too.
Validated frames counts what is done: every approved version, added up. Nothing else counts — not what was imported, not what was reviewed. Since a shot can only have one approved version at a time, no shot is ever counted twice.
Daily quota per animator is the number to watch:
animation left ÷ working days left ÷ number of animators
The line underneath spells out the calculation with your own figures, so the number is never a black box. If it reads —, something it needs is missing: set the dates and the animator count below.
Production dates & team size. By default, working days are the weekdays (Mon–Fri) left between today and the end date — so the quota rises on its own if the film falls behind, which is the point. If your studio does not work that calendar, type a number in Working days and it takes priority. Empty the field to go back to the automatic count.
Progress over time draws itself. A point is recorded each day the validated percentage changes, or whenever you open this screen. The dashed line is the even pace from start date to end date: above it you are ahead, below it you are late.
It follows the reviews, not a plan — nobody updates this screen by hand. It moves when a version is approved, which means it can only tell the truth about what has actually been validated.
The timeline
With a pipeline, a Timeline tab sits next to the overview. It draws the same production in time: one line per stage, in pipeline order, each bar running from that stage's start date to its end date, filled with its own progress.
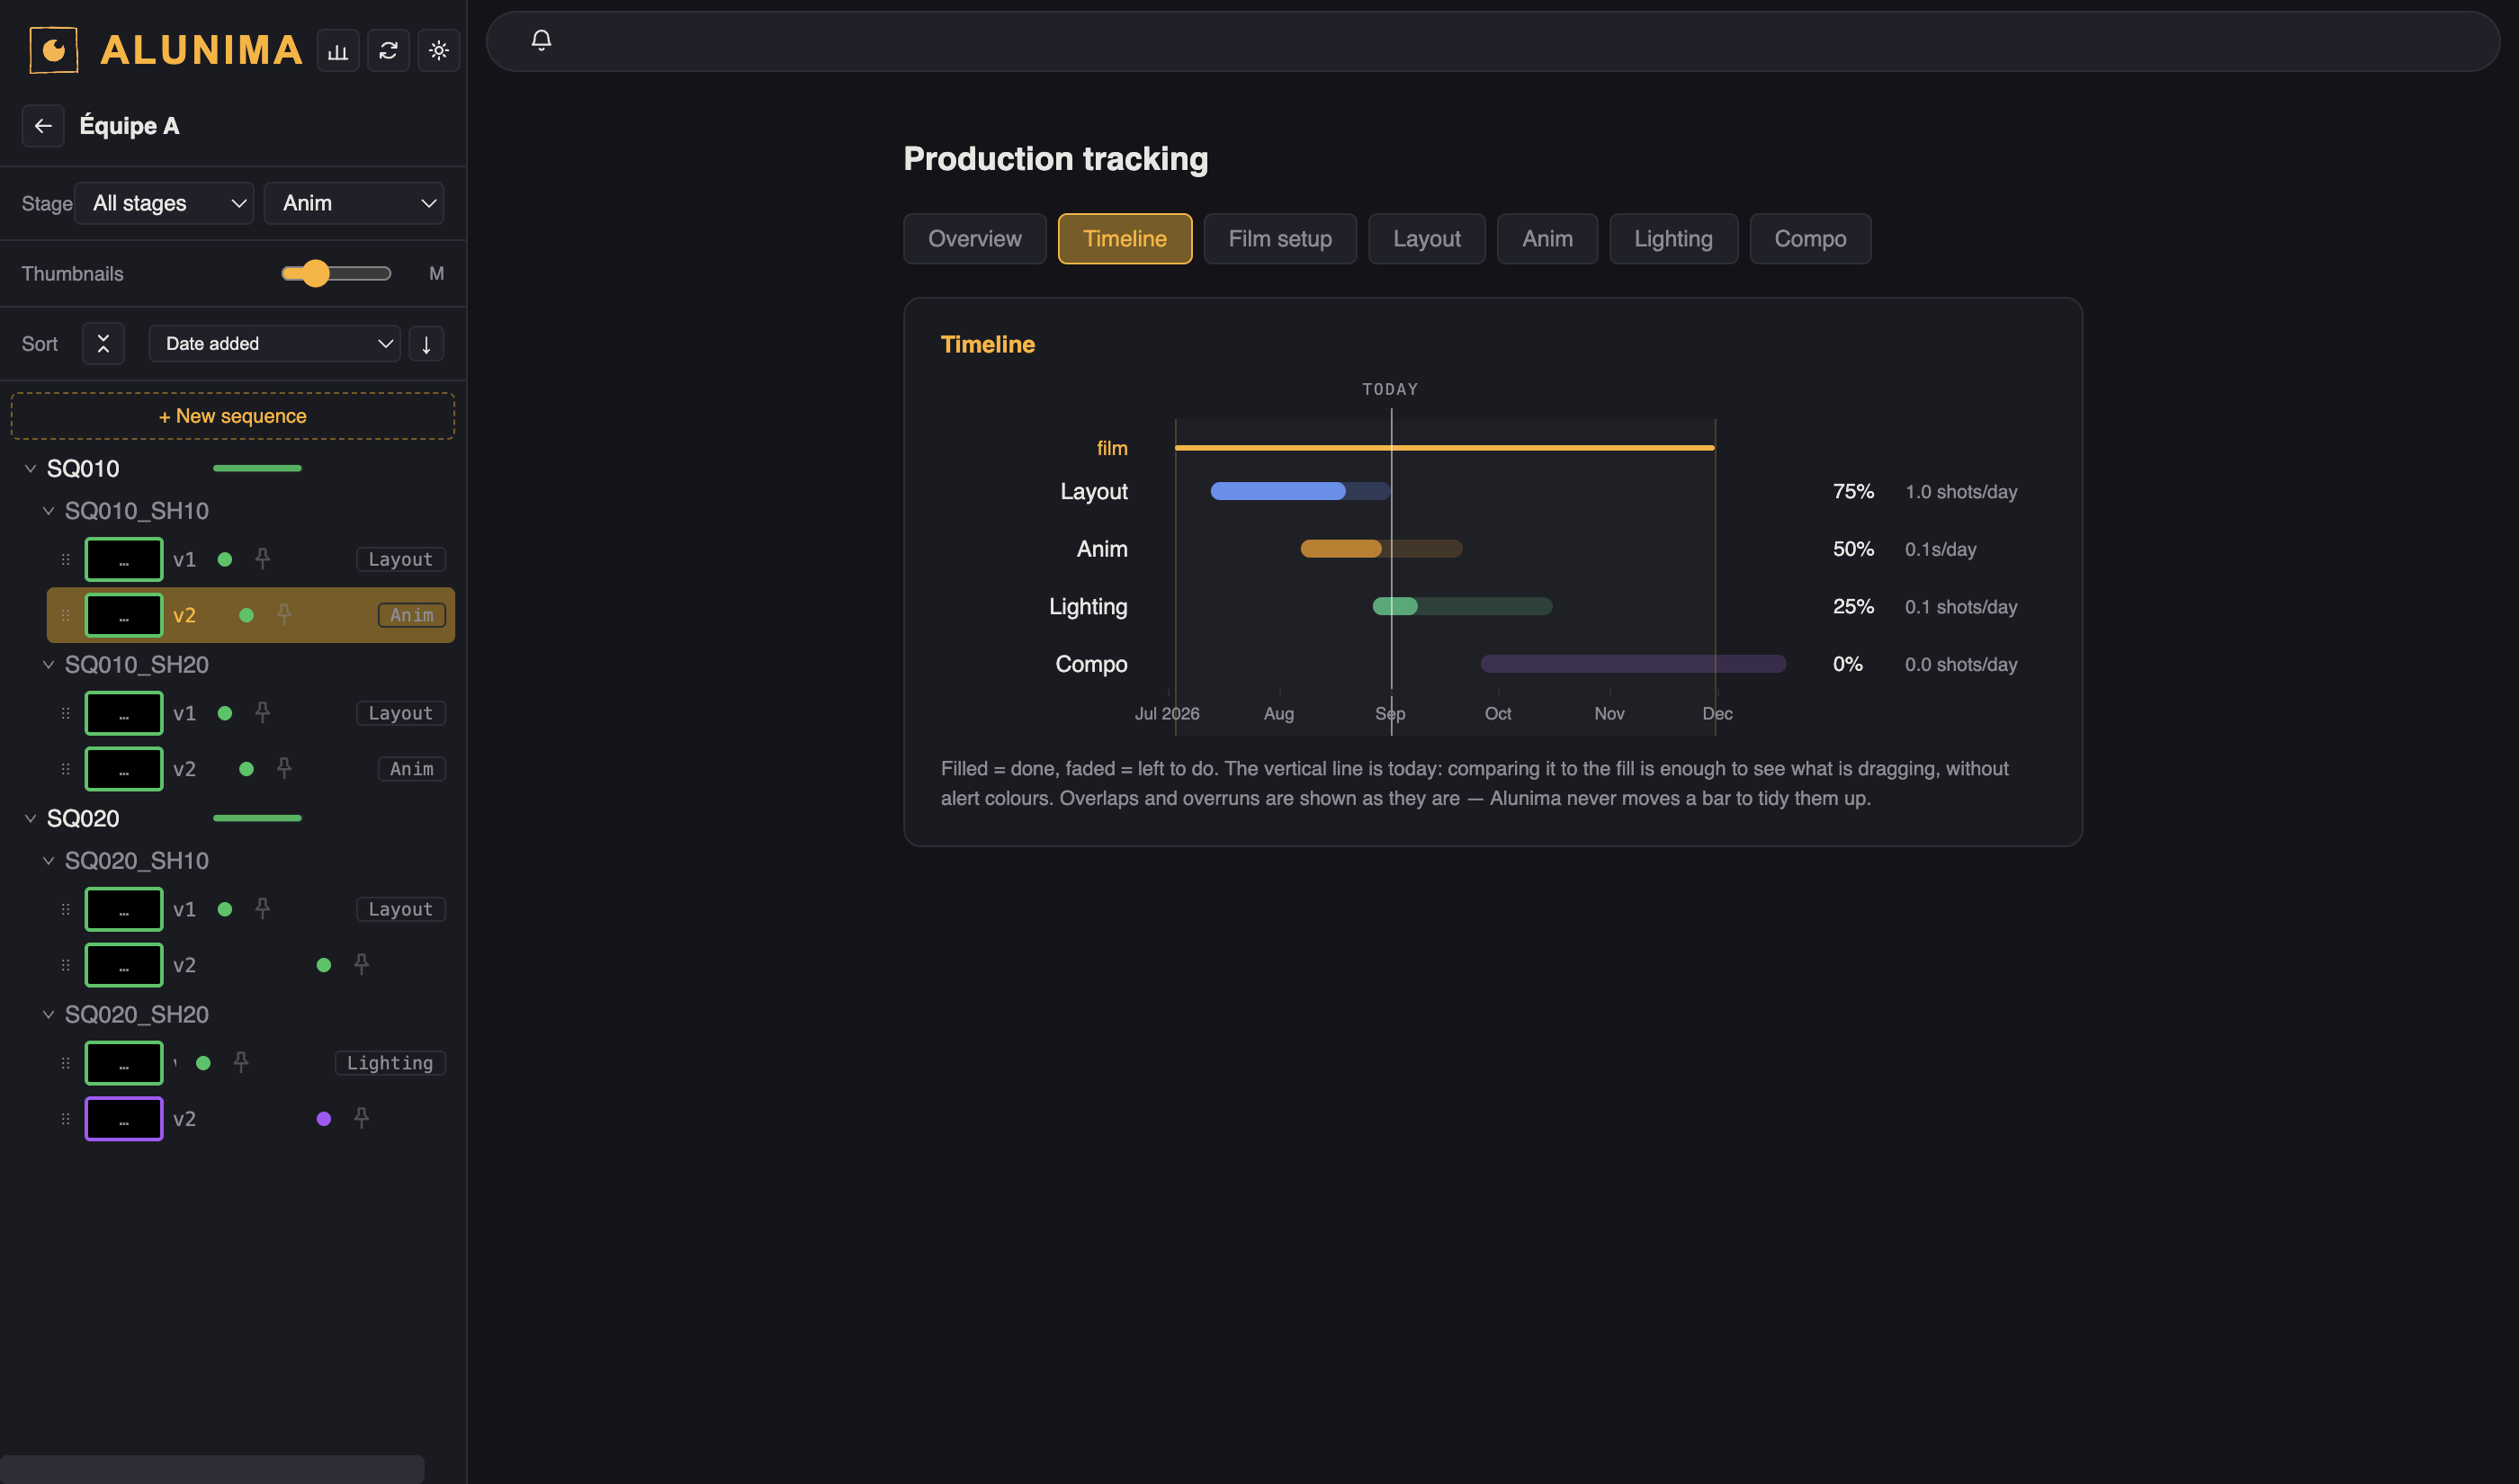
There is nothing new to fill in: the dates are the ones already set on each stage's page. A stage with no dates stays visible, dashed and off the axis — not scheduled yet is information too, and its percentage still shows if some of its work has been approved. The thin amber rule at the top is the film's own start and end, not a stage.
The vertical line is today, and it is the whole point of the screen: comparing it with the fill tells you what is dragging, without any red-and-green alert. In animation such an alert would be a lie — progress is never linear. The honest figure is the quota, and it sits at the end of each line.
Alunima shows, it does not decide. There are no dependencies between stages: no bar ever moves another, and overlaps and overruns are drawn exactly as they are. A stage running past the end of the film is shown running past it. That is deliberate — a tool that quietly "fixes" your schedule is a tool you end up lying to.
Exporting
A short click on the export button exports the version you are on. Hold it — or right-click — for the panel, which offers three scopes:
- this version, on its own;
- this sequence — its approved shots, end to end;
- the whole film — every approved shot, in tree order.
Like every other tool panel, it can be dragged where you want it and pinned open with the pin in its header.
Annotations are burned into the image, and audio is concatenated shot by shot. Still images and native frames export at full quality.
With a stage selected, playback and export follow it. Playing a sequence or exporting an animatic while looking at Anim strings together the shots approved in anim — a shot not approved in that stage is simply absent, since the animatic shows what is done. Looking at all stages, each shot shows itself at the furthest point it has reached in the pipeline.
Formats — the default is WebM/VP9: patent-free and readable everywhere. MP4 stays available when you need it.
Preferences
The gear icon at the top of the sidebar opens the settings, in four tabs.
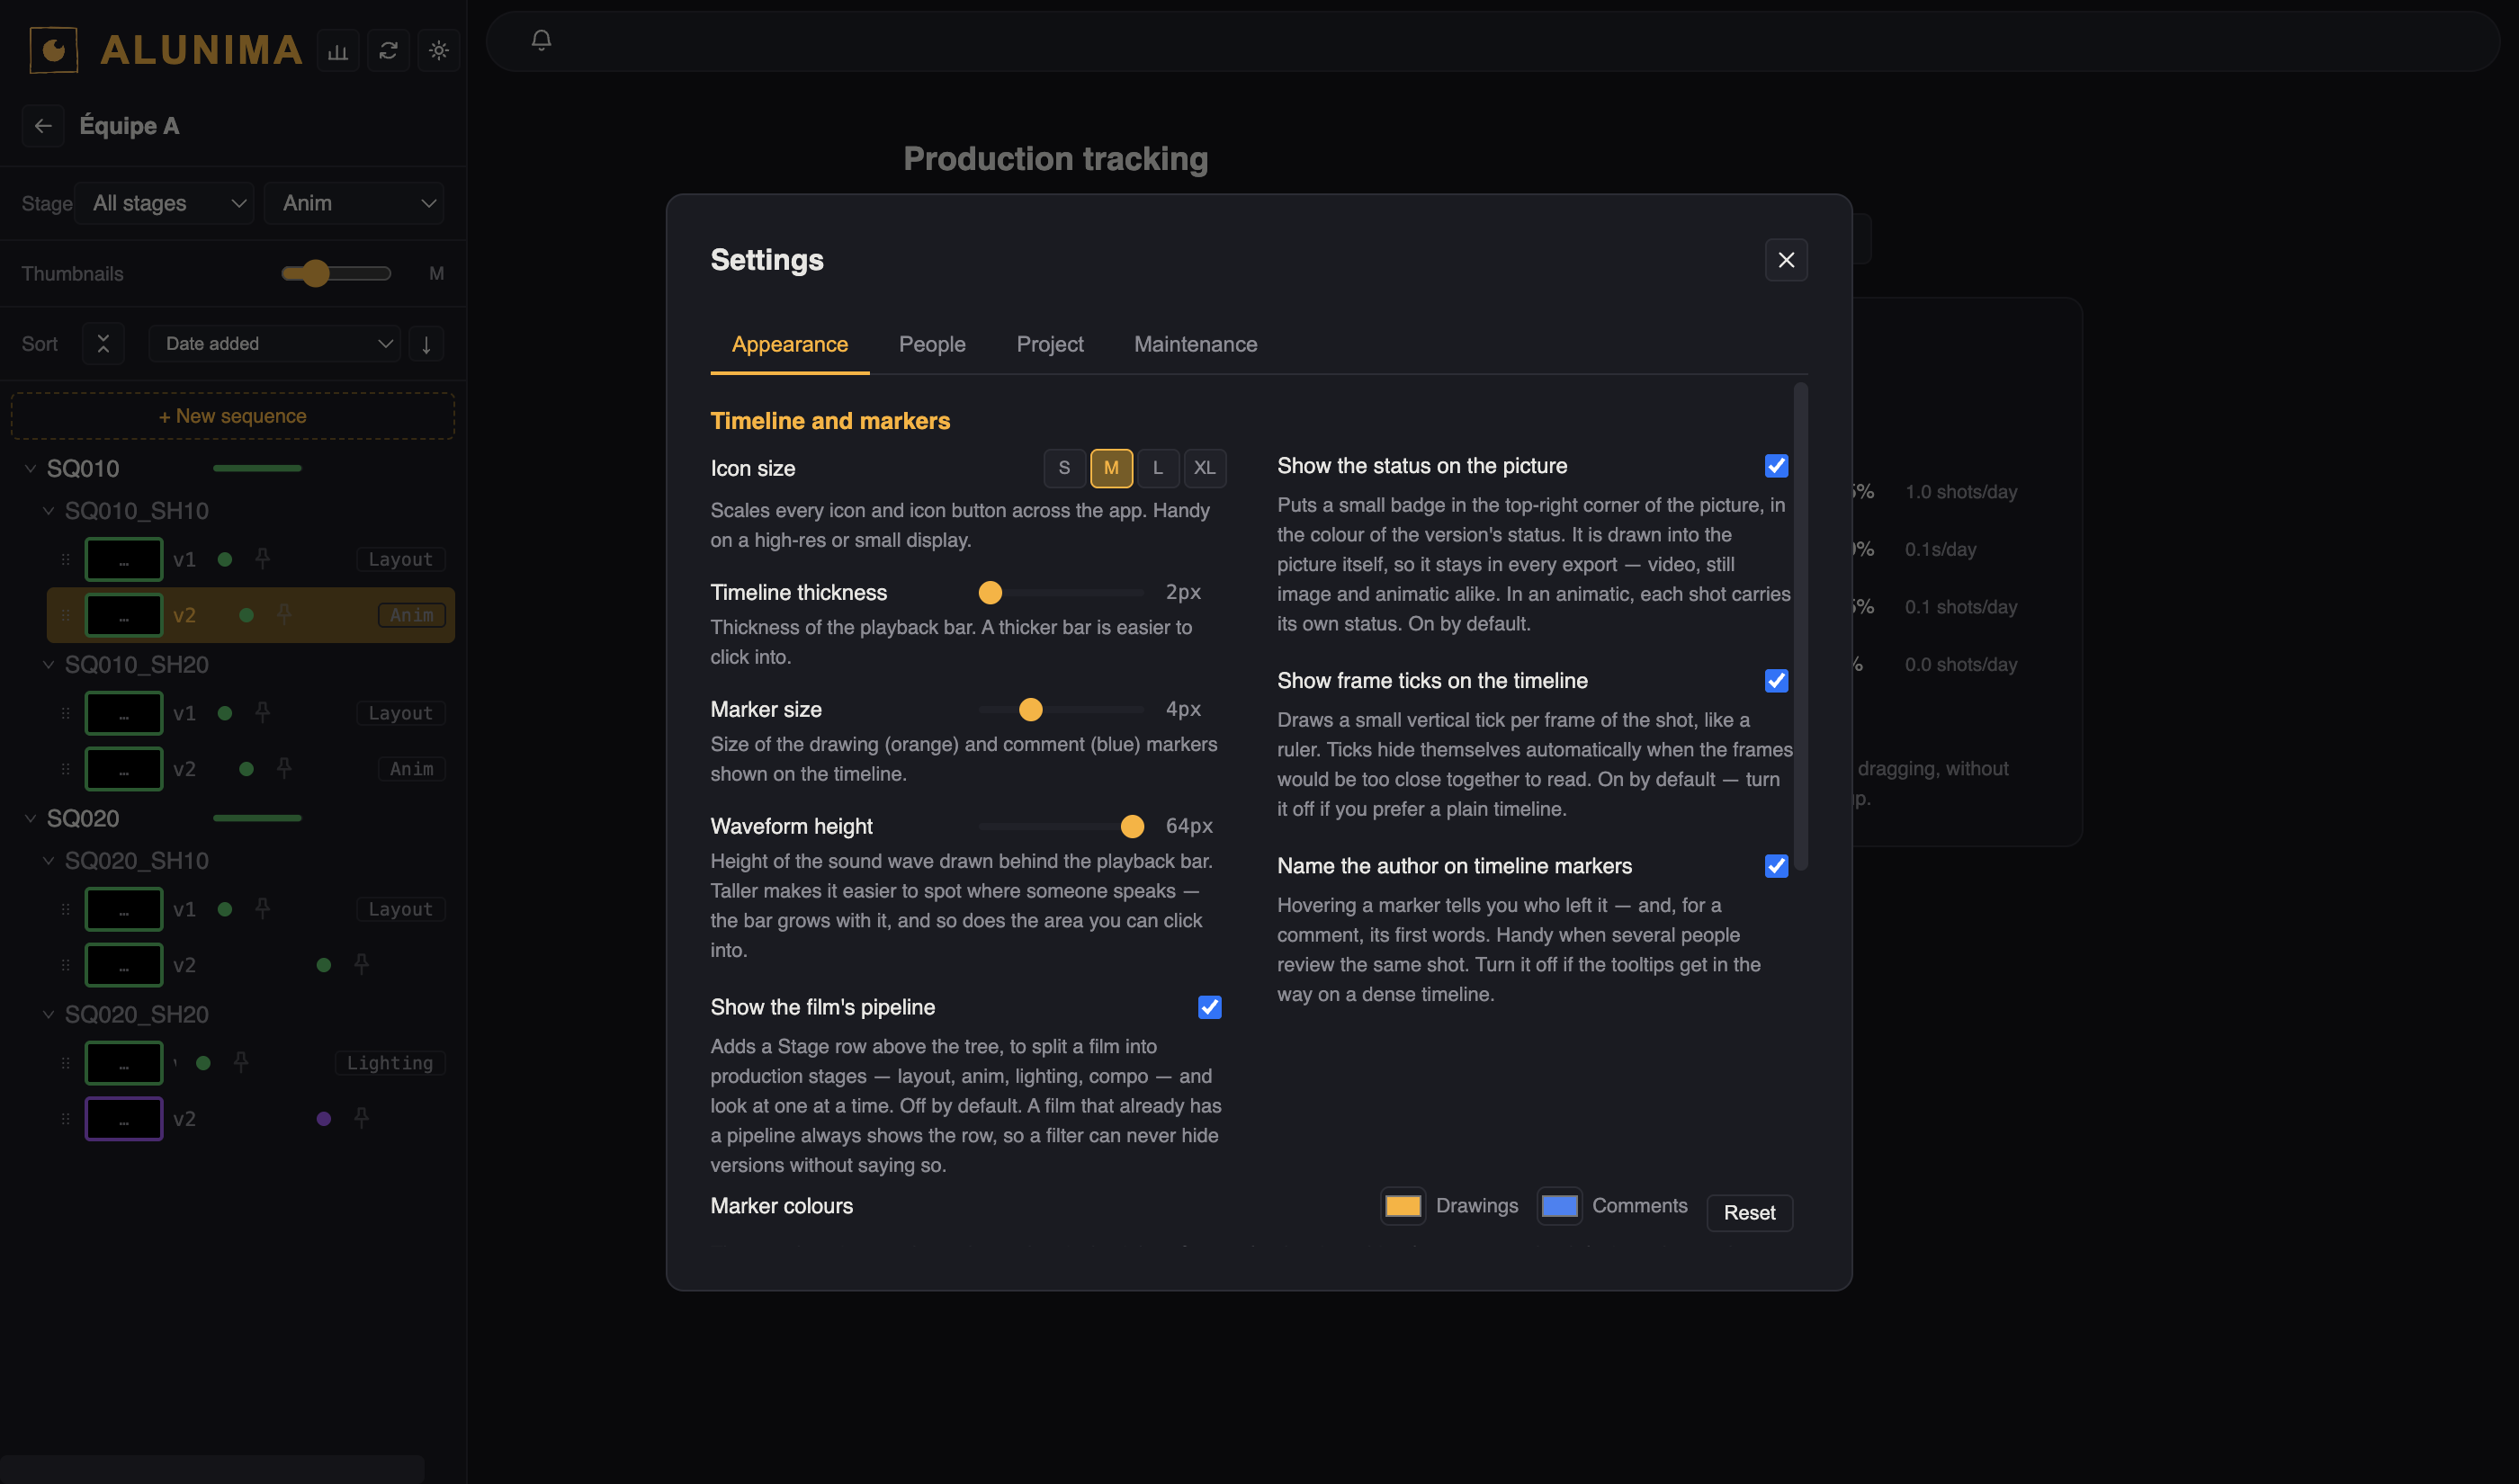
Appearance — how the tool looks and reads.
- Icon size scales every icon in the app. Useful on a very large or very small display.
- Timeline thickness, marker size and waveform height trade screen space for how easy things are to hit: a thicker bar is easier to click into, and a taller waveform makes it easier to spot where someone speaks.
- Show the status on the picture is the badge described earlier. On by default.
- Show frame ticks on the timeline draws one tick per frame, like a ruler. They hide themselves when frames get too close to read.
- Name the author on timeline markers tells you who left a marker when you hover it. Worth turning off on a dense timeline.
- Marker colours — orange for drawings, blue for comments by default. Change them to tell your timeline apart from a colleague's.
- Drawing bar lets you hide the tools you never use. Their shortcuts keep working.
People — who can be credited, and who writes in this folder. The names here are local labels used to sign comments and drawings, not accounts. The second list shows everyone whose file is in the folder, with the last time they wrote.
Project — where your work is stored, the folder for converted videos, and your list of projects. Forgetting a project only removes it from that list: the folder and everything in it stay untouched.
This tab also holds Sync: the refresh shortcut, and auto-refresh, which reloads from disk at an interval you choose. On a shared folder, it saves you clicking Refresh to see your colleagues' changes.
And Import defaults: the frame rate to assume when Alunima cannot detect a video's own, and the quality used when importing images and PDFs.
Maintenance — the tools you hope not to need.
- Repair relinks media whose path points at a machine that no longer has it — typically after a migration. It looks for a file of the same name already in the folder.
- Safety copies are dated snapshots of your project. To go back to an earlier day: quit Alunima, then copy that day's files back into your project. Each folder carries a note explaining where they go.
- Diagnostics gathers what to send when reporting a problem.
- Start over clears things. Read what it says before confirming.
Keyboard shortcuts
Press ? at any time to see this list inside the application — it is always the authoritative one.
Playback
| Key | Action |
|---|---|
Space | Play / pause |
Shift + Space | Play this sequence's approved shots |
Shift + click on play | Resume at the open shot instead of the start |
Shift + click on a sequence | Open or close all its shots |
Alt + Shift + Space | Play every approved shot in the film |
← → | Previous / next frame |
↑ ↓ | Previous / next marker |
I / O | Set loop start / end on the current frame |
X | Clear the loop range |
Drawing and viewing
| Key | Action |
|---|---|
B / E | Pen / eraser |
M | Move the drawing |
S | Onion skin |
P / Shift + P | Pin a ghost frame / clear them all |
H | Hide every drawing |
F / Esc | Fullscreen / leave fullscreen |
R | Start / stop recording a review |
C | While comparing in Flip: hold to show B |
Alt + click | Eyedropper |
Ctrl (⌃) + drag, scroll | Zoom |
Space + drag, middle-click drag | Pan |
Ctrl/⌘ + Z | Undo |
1 – 9 | Jump to a pinned version |
F5 | Refresh from disk |
? | Open the shortcut list |